Living Room Picture Ledges
I’ve said it before, I love the vaulted ceilings in our great room, but they plague me. It’s hard to find the right wall art or furniture to fill the large sections of wall. Well, score one more for me because I figured out another area of wall– the space above our love seat. The solution? Picture ledges.
A few months back I saw some picture ledges in a magazine, and I was all “Oh, I can make those.” Then, on my last trip to Ikea I spotted these 45 inch, white Ribba picture ledges. For $15 each. Sold. Sometimes it’s easier to pony up the cash than to do-it-yourself. If I would have done this project I probably would have spent close to $30 on the wood and paint. And not to mention the 2-3 hours of work I’d have to put into them. There’s a little DIY cost-benefit analysis for ya.
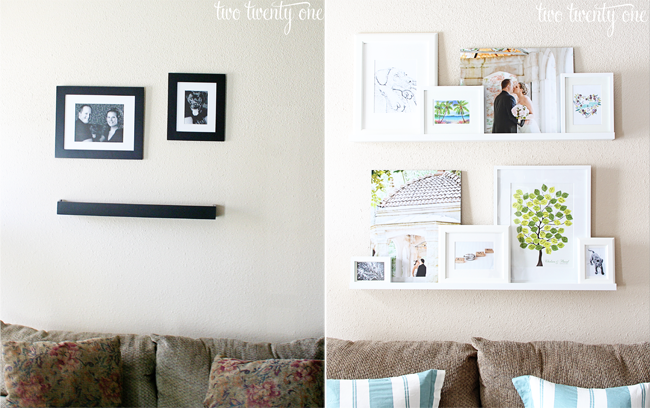
Before we get into all the details let me show you what I was working with before. The before and after image made me laugh because it totally looks like one of those weight loss before and afters.
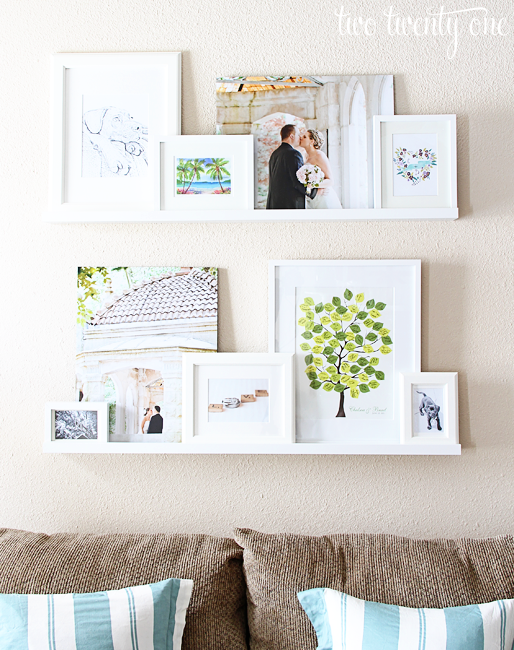
I was basically trying to work with what I had. But as you can see, it definitely wasn’t working. To say I love the ‘after’ is a definite given. The white ledges and frames and the colorful prints brighten up the space. Even the throw pillows I swapped in made this small area more fresh and less dated.
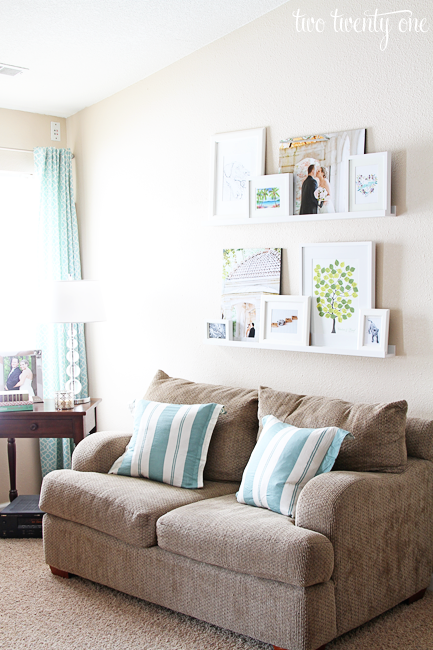
Securing the ledges to the wall was pretty easy. Each ledge comes with three pre-drilled holes. We managed to get the middle screw into a stud, and we used drywall anchors to secure the other two screws. If you plan to install these ledges I highly recommend getting your middle screw into a stud. I don’t think the ledges would hold if they were installed with only drywall anchors and screws.
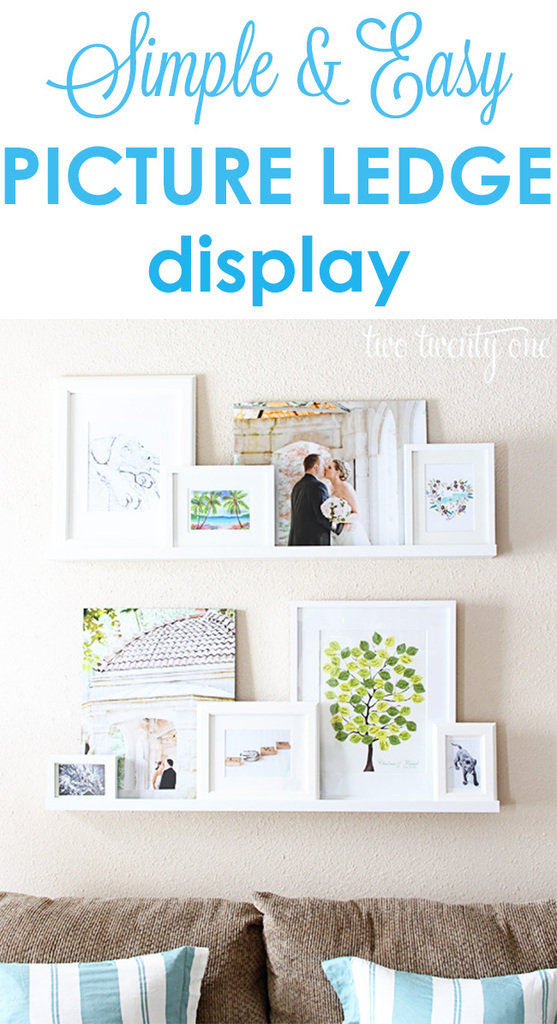
Putting up the picture ledges was a breeze. Styling the ledges was another thing. You wouldn’t think it’d take much time but it did. My need to create visual triangles can be time consuming. So pairing my perfectionist ways and my will to include only images that have some sort of meaning to us resulted in an hour or so of switching photos around.
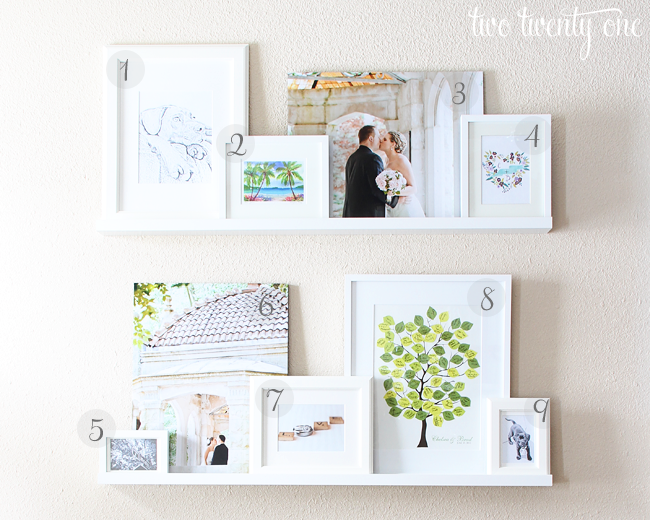
Here’s a breakdown of all the photos I used, in case you’re interested.
1. Sketch of Jack I created in Photoshop.
2. Reprint of watercolor painting I picked up in St. Martin while on a cruise we took in 2008.
3. Wedding print (where we got engaged and had our first look).
4. I made this custom monogram on the Wedding Chicks blog.
5. Black and white photo of a street sign– it’s where Brad and I met in Bloomington. Well, not on a street corner– Brad’s fraternity live out house was at the corner of 18th and Lincoln, so the house was always called ’18th and Lincoln’. Unfortunately, we don’t have a Pretty Woman love story.
6. Wedding print (again, where we got engaged and had our first look).
7. Wedding photo of our rings with Scrabble tiles that make out the word ‘love’. Awww.
8. Our wedding guest book tree. I love that thing. It’s no longer available from the business I purchased it from, but these are similar.
9. Black and white photo of Jack as a pup.
All of the frames are from Ikea.
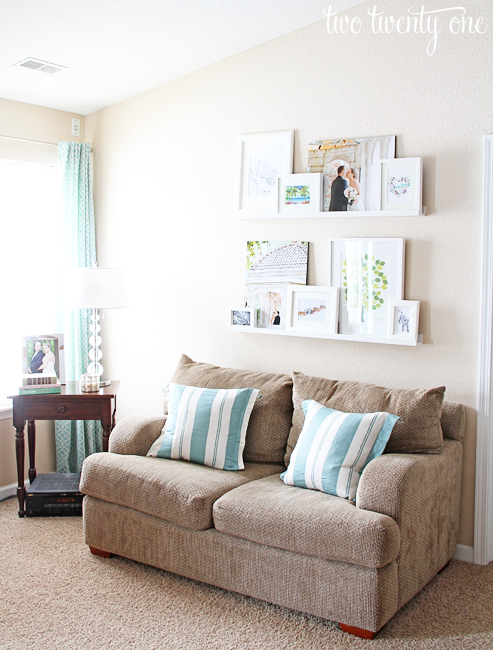
In the end, I spent less than $75 for the entire display. I haven’t figured out how to secure everything to the wall yet. But we’ve had this up for over a month and nothing has fallen off. I’ll get around to the securing part eventually. But if you happen to come over and sit on the love seat, you’ve been warned.

What do you think about the picture ledges?
Have you ever purchased a piece rather than doing it yourself?
I like the display I am glad you had all white frames, they connect all the pictures together.
the ledges seem easy to put up and the fact that the middle one should be in a stud is a goo idea since it’ll balance the shelf well!
You did a good job! I am hoping to do some of these myself someday.
It looks really beautiful. So bright, clean, and perfect for the space!
love it!
the white and all those colors make it look so cheerful. I can only imagine how long it would take to get the pictures to look just right on those ledges.
Every time I look at your photos, though, I’m just insanely jealous of all the light you get!
This looks fabulous! I love the collection of photos and prints, they are so personal, but look really wonderful together. Thanks for the inspiration. I’ve never bought frames at Ikea, and I have a huge stack of things to frame. Are they very economical?
Oh my goodness yes! The frames with 8×10 openings (like the frame that has the sketch of Jack) are $10 each. The frames with the 5×7 openings are $5 each. And the mattes are included! Our nearest Ikea is 2 hours away so I load up on frames when I go.
Are they the “ribba” white frames from Ikea?
These are the Ribba ledges and frames. I bought 2 long (45″) and 4 short (22″)ledges, all white. I’m going to hang them today. Here goes nothin’!
Your new look fits the space so well! Great upgrade!
Do you really want a Pretty Woman love story…lol?
I mean, it would have been kind of awesome if Brad was super loaded and let me go shopping all the time.
This looks amazing. You really have a knack for styling. This is something I always struggle with, and part of it is probably that I don’t spend the time needed. I love the white and it does really brighten up and liven that area.
I kind of like the before better. I kid, I kid.
I need some Ikea frames in my life. Your display looks fantabulous.
I love this, so bright and fresh! What size are your wedding photos? And are they on canvas? I just got ours back and what to get some printed up! 🙂
Thanks! The wedding photos are 16×20. They’re regular prints, mounted on foam. We got them as part of our wedding photography package. If you’re wanting to get some canvases I’ve had good luck with Canvas On Demand. They have Groupons quite often, and their customer service is really good. I’ve also heard good things about CG Pro Prints.
Ah!! Great idea. We just had a friend do our pictures so we have to print them ourselves, foam is a great option. Thanks!!
Ive heard MPIX is good!
Here is the link! http://www.mpix.com/products/prints
I am going to print my wedding photos in an album with Pinhole Press recommended by my photographer (she liked me enough to do that I guess, since she also sold prints that weren’t in my package with her).
Have fun!
I really like this! So pretty and fresh! I love your blog and your photography is simply outstanding. 🙂
So, so pretty. Great work. I love Ikea frames, too . . . I used them for the gallery wall I did 6 months ago and haven’t yet posted. I am on a rolllllll with this blogging thing!
LOVE LOVE LOVE! It looks perfect! I think a trip to Ikea is in my future!
I love the ledges! I have a few in my house and they are great. On the securing question, I have used Museum Putty before and it works great. I purchase it at the Container Store.
Ooh, thanks for the tip! I’ll have to pick some up the next time I’m there.
Looks great Chelsea! I really love all the wedding prints too! And it definitely lightens up the space a lot!
Was anyone else wanting some steamier Matthew/Mary honeymoon scenes? Also I was disappointed in her wedding dress, though I know it was the fashion back then. Loved her headpiece though! I would also have a huge crush on the new ginger footman if he didn’t have the face of a twelve year old.
And oh yeah, nice frames. 😉
The whole display looks great! I love that you chose meaningful photos too 🙂
The shelves look amazing! It adds so much more character to the space.
Found you on: Sarah’s before and after link party.
Love it!!! So fresh and bright. For securing them, try 3M command strips. That way you can move them around and no damage to your walls. I use them for all of my leaning frames and gallery walls, and I actually usally cut them a bit smaller because they aren’t really supporting the weight, just keeping them from tipping.
Gorgeous!! Haha I love that you kept it real about whether or not to DIY — I have that debate in my head ALL the time! Plus, look at all of the extra time it gave you to spend on switching those photos around — now it’s done AND perfect!! WIN!
It looks great!! I love the photo ledge look. I too wanted to DIY some until I saw the IKEA price and I picked up one for over our sofa too. I will definitely agree with you on the stud thing. Ours didn’t end up landing on a stud and it pulled out of the wall after a few weeks. We had to get super heavy duty anchors and it’s up and holding now. You did such a great job of styling the shelves! I’m still working on ours.
the new picture ledges look great! nice collection of pics too.
is it just me or does the before look a bit like a drunk face? once you see it, you can’t unsee it. good thing you changed it up!
I love how it looks!! So bright, cheerful, and airy! 🙂
I just might have to sashay on over to IKEA and get me some of those myself! Thanks for sharing!
Large walls can be SO difficult to work with! I think you handled it beautifully with these ledges and gallery. 🙂
I love these! I have the thick picture ledges from West Elm and just love them. I even have my dad and aunt’s old record albums on the shelf.
Pretty pretty pretty!! All of the white is gorgeous! Your whole area there is so bright, and fresh, and airy! Definitely my kind of style 🙂 I love it!
We made our own picture ledges (http://simplyparkers.blogspot.com/2012/06/almost-10-picture-ledges.html) but if we were going for something smaller scale these Ikea ledges would have been perfect! Yours look super cute. May have to pick some up for another place in the house.
LOVED Downtown Abbey, it was well worth the wait…so happy that Matthew and Mary FINALLY got married!!
OMG, DOWNTON Abbey, not Dowtown, geez autocorrect!
World. of. difference!
The white frames + white ledges + little doses of pretty color = perfection!
Just had to comment and say I love this!!!
Definitely inspired me to try it in my living room where I’ve been dying for inspiration.
I really love this picture display!! Seriously… you did a great job on arrange the frames in just the right balance of height, color and depth! Great job!
The ledges look great and you are totally right that sometimes it is worth it to just pony up the cash!
Stopping by from Serenity Now’s linky. Oh and…don’t throw stones, but I have yet to watch Downton Abbey.
These look really great! I’ve been looking for a way to incorporate more photos in my house and this would be perfect!!
Jenna @ rainonatinroof.com
That looks fantastic! Lovely combination, and it really updated the space. Thanks for sharing! 🙂
Your wall looks so amazing! Nice job! Also, thanks for introducing me to the Wedding Chicks blog! I’m excited to check it out!
Your picture ledges look great!! I just made some for our daughters reading nook to hold books, but they were much smaller. I’m also wanting to put something like this over our couch in the living room. I so wish IKEA was closer than 4 hours but I may have to check these out online and save a little time on the DIY! Thanks for sharing. I love your pictures you chose!
Beautifully done!
I LOVE those Ikea shelves. We have a heritage gallery in our upstairs hallways, and used them in our pantry for our cookbooks.
http://www.dejongdreamhouse.com/2012/09/cook-book-shelves.html
Great idea. I love your couch pillows too!
Thanks for the inspiration… I’ve been in a “picture ledge rut” (hung but nothing to fill them with), and your post was full of great ideas. It also met my husband in Btown – embarrassingly enough, at Nick’s. It’s fun to see that Bloomington has a special place in your heart, too!
Love this Chelsea! I just purchased one of these ledges for over our desk and your display has really inspired me. 🙂
IKEA is great and I love the before and after images. You are right about the weight loss. You did an amazing job with these ledges. I don’t think you really need to secure the images to the wall. Just leaning them against the wall seems to work. Great work and thanks for sharing.
Cheers!
J
oh my GOODNESS…i’m doing this when we move next month. so perfect and so easy! yay!
What are the sizes of the medium and small frames? I LOVE IT!! I have a gallery wall in my bedroom but something seems “off” about it and this would be the perfect answer! Also, how far apart are the shelves? Thanks!!
LOVE your ledges and the various sizes of frames!
I love it! Where did you get the curtains, I love those as well!!!
Thanks! I made them. Here’s the tutorial: https://www.twotwentyone.net/2012/08/how-to-make-curtains-diy
I love how this looks and I love how it has almost everything to do with your wedding, but doesn’t look like a shrine. I have quite a few wedding pictures to hang, but I am so worried each room will turn into a wedding mess
Those photo ledges are great! I might have to take a trip to Ikea to search out the shelves. Thanks for sharing your tips!!!
I skimmed thru this post a couple times and just now read the comments… And just my luck, no one has mentioned anything about your couches. It would be amazing if you told me where you got them and the brand/color. If you told me then you may be my new favorite person.
Hey, Leah! So those couches were purchased in 2003 at Sofa Select, which went out of business, by my parents, and they were passed on to me in 2006. I have no idea who the manufacturer is or the color. I’d try to look at the tags, but we sold them this spring. Sorry I’m no help. Crazy thing is that I’ve done a TON of couch shopping this year, and I never came across anything that resembled them, especially the fabric. The fabric was super forgiving. We have a black dog and you could barely see his hair on it. Again, sorry I can’t help you out. Hopefully I’m still in the running for your new favorite person. 🙂
Just my luck! Lol I’ve been married for 2 years and we still have my husbands bachelor couches. Yeah… One of them looks like a smushed face. I don’t even know how to describe it. AND! To make it way worse… It’s sage color. I’ve desperately wanted white couches since we’ve been married but I just don’t see it happening. We have a dog also… I rarely find any neutral couches that I like. I’m picky about the fabric, color, shape and size. Needless to say, I’ll be looking for a new couch post from you in the future. Btw, your quick reply definitely keeps you in the running for new favorite person 🙂
I know what you mean, I’d love to have big, cushy slipcovered Pottery Barn-esque white couches but with a black dog that wouldn’t be possible. I’m super picky too, especially about furniture that I’m paying $$$$ for. Furniture places should be getting new inventory in the next few weeks (at least that’s what one salesperson told me) so maybe plan a couch browsing day. Best of luck! And I’m honored to still be in the running for new favorite person.
I know that ‘traditional’ couches with the fabric that looks like crewel work isn’t in style nowadays, however, it is the best for hiding dog fur, the tiny crumbs from children of all ages. See if you can find a tweed in the colors of your dog. Our 1st house had painted white trim; I would clean the spots daily and once a month my husband ran around with a pint of white paint covering all the spots I couldn’t get off. After doing that for 5 years, children and a dog, every house since then has had stained woodwork. It may not make your house look bigger, but I didn’t want to yell at my kids constantly. I wanted to do things with them.
I’m loving this idea, I’ll be running to ikea to get the ledges in some mins. Thanks for the tips, you rock…..
Chelsea,
How deep did you make your picture ledges? What type of lumber did you use? Or did you buy them already made up? I don’t want to go to Ikea..too big to walk around in and difficult to find your way out. Done that before along with a lot of other shoppers that kept riding up/down on the elevator trying to find a way out of the store. Finally, an employee used her key pad and let us out to the parking lot. She said a lot of people steal merchandise and that is why they made the store like a maze. Have you ever ordered anything online from Ikea and had it delivered to your home?
I purchased the picture ledges from IKEA. I’ve never ordered online from IKEA. I try to go once a year to stock up on things, or I have my friend, who lives near one, pick up things for me and being them when she comes to visit. You can search “DIY picture ledges” on Pinterest and find tons of tutorials.
If you secure the *bottoms* of the frames to the ledges with the museum quality putty or gel (QuakeHold is one brand out there on Amazon), that might do the trick. Since you’re not in an earthquake prone area like SoCal or Alaska, it should be more than enough to hold some leaning frames!
Looks fabulous! And I love how you tied the colors to the couch – very nice touch!
I love using these picture ledges for photos in our house too. They are inexpensive, easy to use, and look great. Thanks for linking up with Inspire Me Monday. I hope you have a spectacular week!!
That looks fantastic! Lovely combination, and it really updated the space. Thanks for sharing! 🙂
I’m terrible at styling shelves, so I’m trying to recreate your frame sizes exactly. Could you possibly tell me the sizes of your frames? (The outter dimensions) I’d be so grateful!
Also, is the frame your tree in a “RIBBA”? Thanks!
You did a great job on your photo ledges! I am going to use your image as my model for completing ours! Thanks for the inspiration. Can you share where you purchased your wedding book tree? I love all the color. Thanks!