DIY | giveaway | Home Decor
Mossy Ampersand Tutorial {&} {DIY}

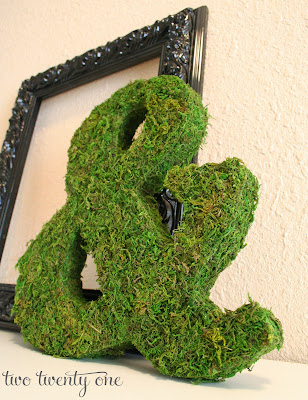
The other day I made a moss covered ampersand to go in between the moss covered “C” and “B” initials for our wedding. We’re getting married in front of a large, stone fireplace, and we’re going to set them on the mantle.
While I was making the ampersand I couldn’t help but to keep singing “I’m mos-sy” to the tune of
Kelis’s “I’m Bossy”. It went something like this, “You don’t have love. You you don’t even have to like me. But you will respect me. You know why? Because I work with MOSS… I’m mos-sy.”
I like to think that Brad shaking his head and laughing at me was his way of appreciating the multitude of my creativity.
So, the “C” and “B” were easier to make because they were pre-made paper mache letters. {Here’s the tutorial I did on the “C”.} The only paper mache ampersand that I could find was online, and it would cost $12 {that includes shipping}. I decided to pass on it and make my own. After the wedding, I plan on using the ampersand in my office or maybe on the entryway table.
I used the following materials:
- Styrofoam
- Spanish moss table runner
- projector
- laptop
- poster board
- pencil
- green spray paint
- hot glue gun
- Sharpie
- scissors
- Xacto knife
Instructions:
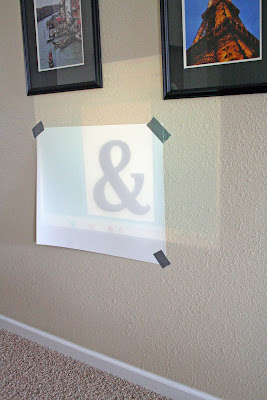
- In Microsoft Word, make an ampersand in font size 600. After much font research, I chose to use the font Cambria.
- Hang your poster board up {I taped mine to my wall. Don’t worry, no paint was harmed in the creating of this project}.
- Project the ampersand onto the poster board and trace the ampersand with a pencil. {I borrowed my friend’s projector to do this. The size of ampersand I needed was too large for an 8 x 11.5 piece of paper. But you could always print it out as a poster on your computer– I just couldn’t figure out how to do that.}

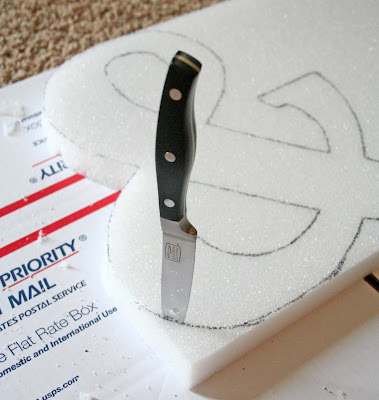
- Cut out the ampersand with scissors.
- Trace the ampersand onto the Styrofoam with your Sharpie. Save your poster board template. You’ll need that later.
- Cut the ampersand out the Styrofoam with the knife. {While I’m not the biggest fan of the carpet in our house, I still put cardboard underneath the Styrofoam to protect the carpet.}
Now, here’s where I hit a little snag. I broke the little arm thingy off of the ampersand. Whoops. Enter hot glue gun. See, all better!
- Unroll the Spanish moss table runner. Turn the ampersand so that the front is facing the correct direction. Trace the ampersand with your Sharpie.
- Cut out the Spanish moss about 1/4 inch outside the tracing line so there will be a slight lip when you attach it to the Styrofoam.
- Hot glue the moss to the Styrofoam.
- For the side edges, cut 1 and 1/2 inch strips of moss and hot glue them to the Styrofoam.
- Spray paint the backside of your poster board template with green spray paint.
- Place the poster board template onto the backside of the Styrofoam.
- Bend the moss over and hot glue it to the poster board. You may have to cut or fold some of the bends to get them to lay flat. ***Note: My ampersand ended up being 13 inches tall.
That’s it!I can’t wait to see these on the mantle at our wedding ceremony!

 Enter hot glue gun. See, all better!
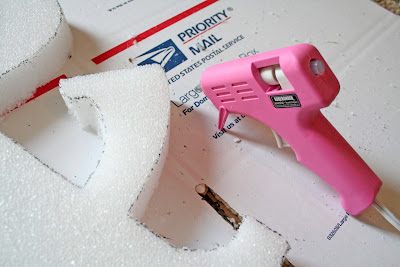


Love it. That turned out really cute!
those are really cute! I love the look of all the letters together! they look great! I am getting married this October and I might have to “steal” your idea…not sure where I would put them but I love the look of them and then they could decorate the house after!!
A very creative job well done. Your tutorial was very visual and clear. Loved it! Yvette x
http://yvettesblogs.com/2011/03/28/salted-eggs-easter-tutorial/
Thanks for the tutorial. I have an “S” that I wanted to cover but didn’t really know how to do it. I’m your newest follower and would love for you to check out my blog as well…
I want to feature your peony topiary tomorrow! Thanks for a great new blog to follow.
LOVE the way it came out, I will definitely give this a try!
Great tute. I just saw an overhead project at SA last week. Schools rid of them often now that many have moved to smart boards…I need one as well.
Great tute.
🙂
Oh, I love your mossy ampersand! It’s my favorite symbol (is that weird?). And thanks for the tutorial.
Love the ampersand sign!
xo Cathy
Ohhhh.. we are back to rain today.. the moss is so nice and springy! Have you tried using a hot-foam knife for cutting?… it is divine!.. no little bits! I got mine at Harbor Freight!
Great project!
Maddie- the D.A.
perfect 🙂
How adorable! I’ve been uberobsessed lately with wall-sized letters, so this is right up my alley! LOVE IT!
I love these. 🙂
OK I LOVE this idea!!! It puts a whole new twist on how to make the moss letter! I am new to the blogging thing and am hosting my very first link party today and was wondering if you would like to post it on there for people to see??
my site is mondellofam.blogspot.com
talk to you soon!!
libby
love this idea! I am looking around my house so that I can do this for free! Thanks for sharing!
Those are very cute! Great job!
So pretty! Especially for spring!
I’m your newest follower. Stop by my blog sometime–I’d love to have you as a follower, as well! 🙂
morrowsunshine.blogspot.com
I love that you did this with your initials! beautiful. ~Lori
LOVE, LOVE, LOVE it!!! WOW! I’m jealous. 🙂
Those are so beautiful! If I had somewhere in my apartment to put them I would be making them today.
Ellie
http://homestitched.blogspot.com
So cute! Congrats on the wedding!
Great tutorial! I’d love for you to submit this to the M&T Spotlight at http://www.makeandtakes.com/spotlight
I love this! Thanks so much for sharing! Found you at seven thirty three!
This is awesome! I had wanted to make an ampersand, but couldn’t find one anywhere. What a great idea!
Wonderful tutorial and I love the way it turned out. It looks great alone, but also with your letters. What a special way to decorate for your wedding. Love it!
(psst.. I’m sharing a link to this project on my FB on Saturday)
Thanks for linking up this week! I’ll be featuring this on my blog on Saturday!
http://sumossweetstuff.blogspot.com
Thanks!
Sumo:)
Love this! I’m inviting you to link to my Delightfully Inspiring Thursday Party. http://delightfulorder.blogspot.com/2011/03/delightfully-inspiring-thursday-party-5.html
DaNita
Well you’ve already got a zillion comments on how awesome this is, but I thought I should be comment a ziilion and one. It is that fabulous!
I really like this! What a great idea for spring! Or heck – year round!
Chelsea! This is beautiful! I’m totally green with envy 🙂 I just featured you on my blog http://www.thriftyandchic.com, come grab a button if you’d like 🙂
~Alicia
Great job with this! What a cool idea to use the window to project it:) They look beautiful all finished! Thanks for linking this up at my party:)
Looks great! I love “mossy” things lately…and hear that in the voice of the guy on “You’ve Got Mail.”
This looks so good – like it’s store-bought! I love it with your initials.
That really is so cute! I have a question though – do you end up finding bits and pieces of the moss? And also, where do you get a moss runner from? Anyways, I love it!
Very impressive! Thanks for linking up!
I would love for you to link up at my Make it for Less Monday’s at http://simplycadence.blogspot.com
I can’t get enough of this! I just love it!
We’re also getting married in June and initials are going to be everywhere…I love this idea and the empty frame behind it also fits our theme! I can’t wait to try it out! TFS
Those turned out so nice! I love it! Great job on the tutorial, too. They look so easy. 🙂 It will be beautiful at your wedding.
Wow…great job on this. Thanks so much for sharing it at my Swing into Spring party.
You’ve been featured this week at my Hookin Up with HoH Party!
Please feel free to stop by and grab a button if you’d like!
~Allison @ House of Hepworths
Great project!
I featured you on my blog and would love for you to stop by!
Amanda
Frillsandfrolic.blogspot.com
I love this project! I was wondering though, I went to buy the runner at Michael’s and it smelled something awful, I didn’t have a coupon so I didn’t buy it, but do the runners smell terrible everywhere or just at my Michael’s? Also, do you seal it and do you think it will dry out at all? I’m testing mine on some styrofoam balls to see if I like it for aisle decorations.
Love the idea!! Although, for me buying the ampersand on line may be easier than finding a projector. I have searched but can’t find the one you found. Can you point me in the right direction. Can’t wait to get started. I’m making it for my daughter’s wedding. I have finished the letters now, but can’t find the ampersand. THANKS!!!
This tutorial shows that even I can do this.
They should have something to share with the target audience.
You can now enjoy your leisure time together with your friends and
families with its tandem capacity features. In that same site
also, you can actually reason out some stories about your company and your company needs.
A UK composing service with 28 decades. Employ an essay writer from our pool of specialists to avoid your academic stress. Hire British writers with a expertise to write any kind of essay! We offer assistance on any issue and with any subject. Meet our writing service in the uk! Learn about our mission, establishment information and making us a market leader. free handwriting papers