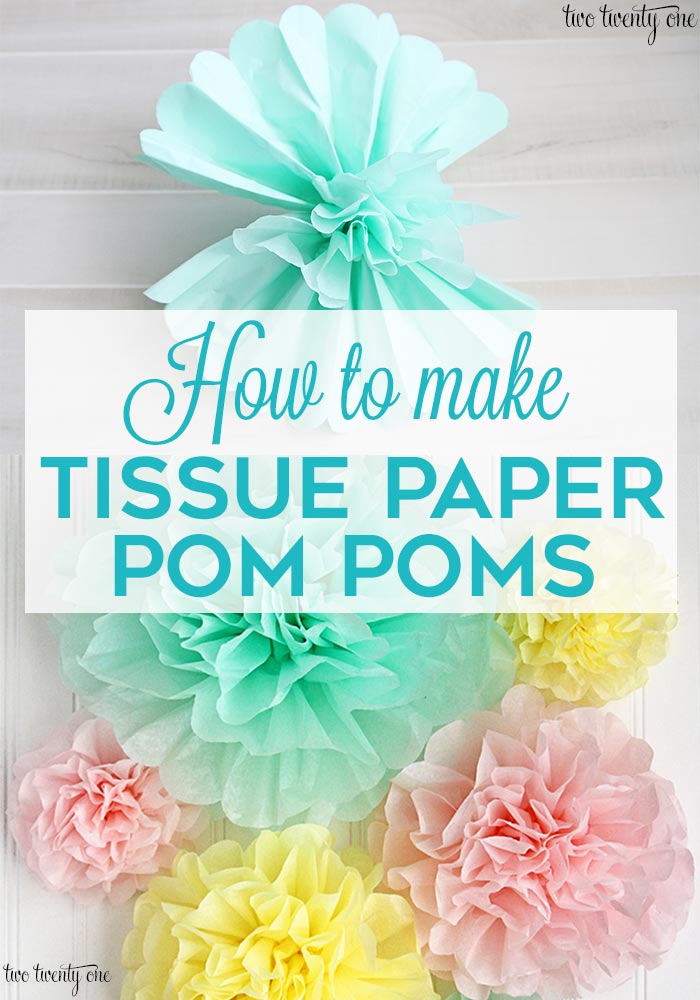
How to Make Tissue Paper Pom Poms
Step-by-step tutorial showing you how to make tissue paper pom poms! Tissue paper pom poms are the perfect, inexpensive party decoration.
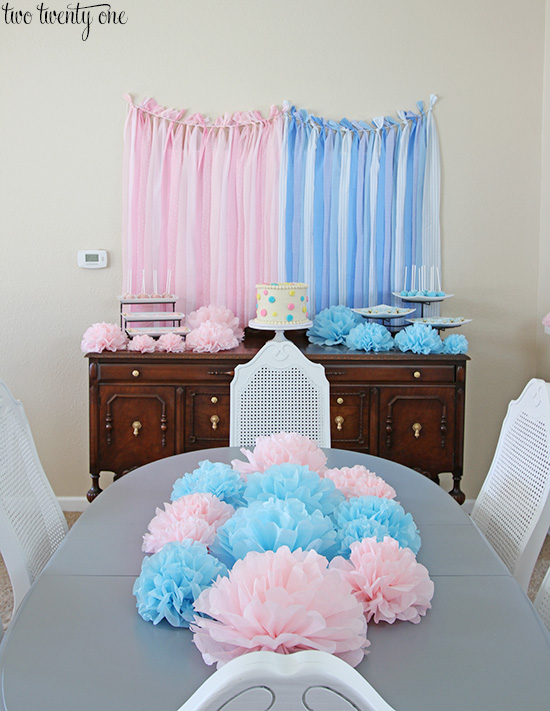
After I posted our gender reveal party, many of you wanted a tutorial on how I made the tissue paper pom poms. Well, today’s your lucky day– it’s tissue paper pom pom making time, people.
Not only will I show you how to make tissue paper pom poms, I’m going to show you how to get 5 easy to make tissue paper pom-poms (1 large, 2 medium, 2 small) out of one $.99 package of tissue paper.
These are really easy to make once you get the hang of it. It’s also a good mindless TV watching crafting activity. But you have to “watch” something you don’t really have to pay attention to since you’ll need to watch what you’re doing with making the poms. I “watched” old Grey’s Anatomy episodes on Lifetime while I made the majority of mine for the gender reveal party.

Supplies for Making Tissue Paper Pom Poms
tissue paper (I use 10 sheet, 20 inch by 20 inch)… Hobby Lobby
NOTE: Since publishing this tutorial, Hobby Lobby has changed the tissue paper to 8 sheets and $1.29 per package. Not cool, in my opinion.
floral wire
scissors
ruler
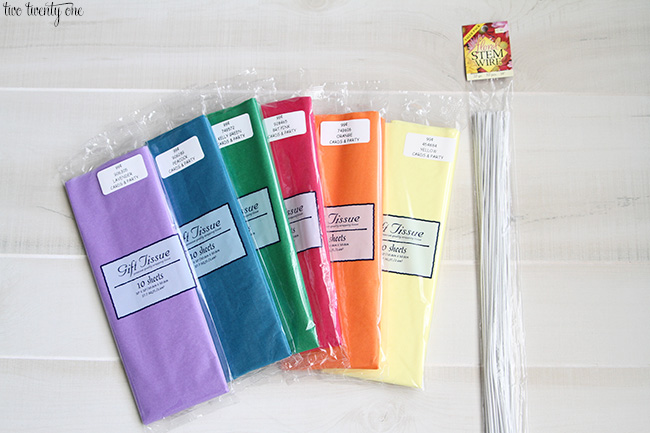
If you can’t find 20″ x 20″ tissue paper that’s fine. The standard size seems to be 15″ x 20″. You can still make tissue paper pom poms from that size, you just won’t end up with the exact 5 pom poms that I was able to make.
How to Cut and Fold
Flatten out the tissue paper. Divide the 10 tissue papers into half– so 5 and 5 in each stack. Set one stack to the side.
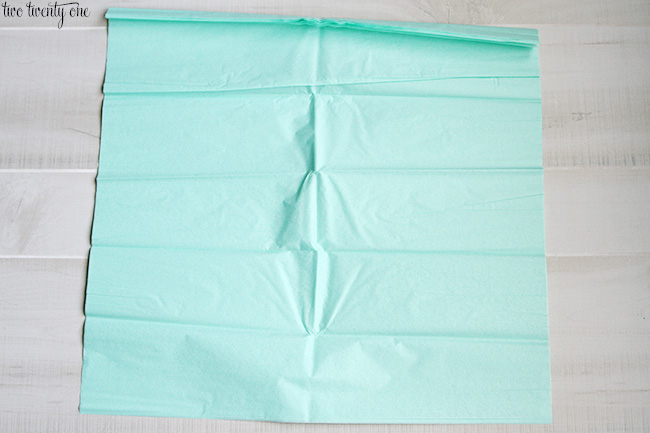
Fold the tissue accordion style.
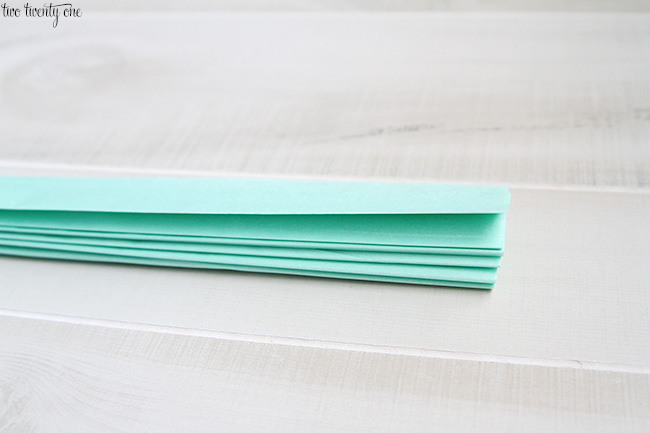
Once folded, cut the strip into two pieces. One should be 6 inches.
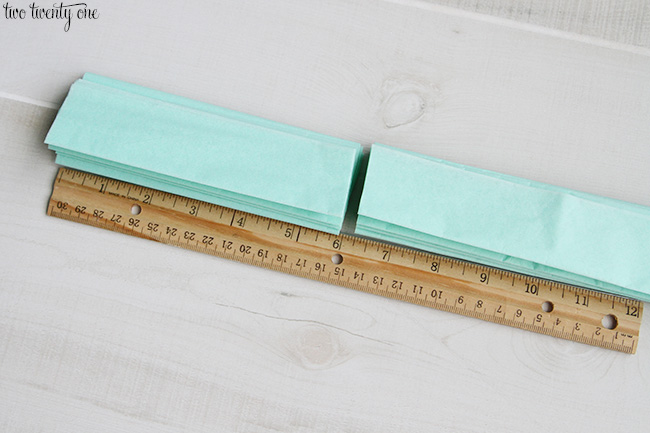
And the other should be 14 inches.
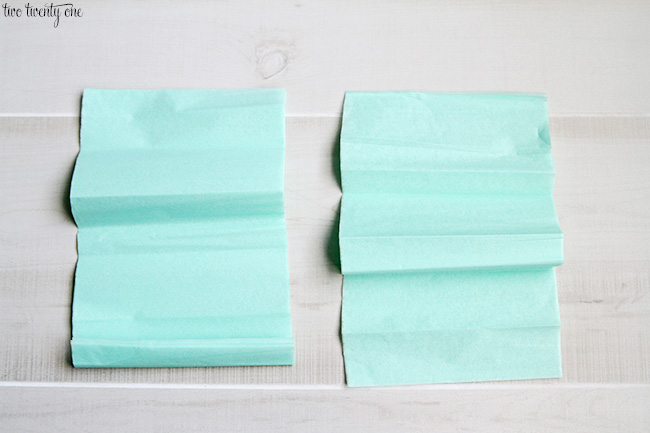
Take the 6 inch piece. Fold it in half hamburger style (if you don’t know what I mean, Google “fold paper hamburger style”).

Cut it along the fold, so you will have two sections with 5 sheets of paper in each section. Since these will be the smallest pom-poms, I refold them, accordion folds style, only smaller than the original fold (see photo after the photo below).
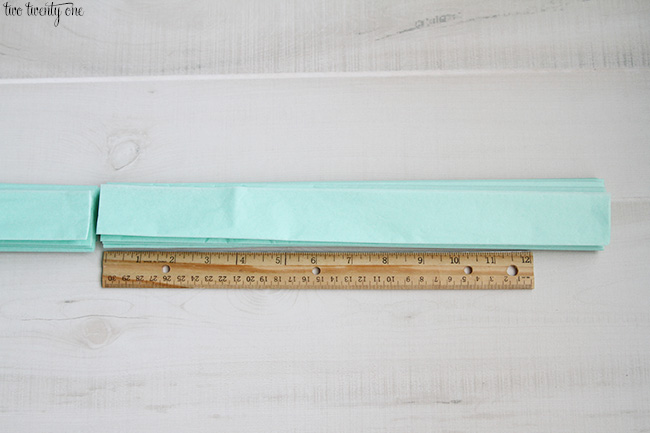
Grab the other remaining section that you put to the side in the beginning. Fold it accordion style. Cut it in half so you have two 10 inch pieces.
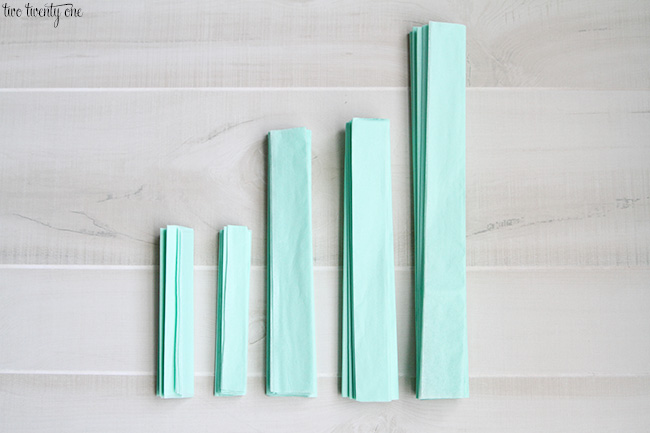
In the end, you should have the following from one package of 20 inch by 20 inch, 10 sheet tissue paper.
1- 14 inch
2- 10 inch
2- 6 inch
How to Secure and Fluff
The next steps are to be repeated for each section of tissue paper.
Grab your floral wire, center it in the middle of the tissue paper (use the ruler if you aren’t good at eye balling– no shame).
FYI, you don’t have to use floral wire. I actually used 22 gauge jewelry wire for the pom-poms I made for our gender reveal party because I was out of floral wire and didn’t feel like running to the craft store for more. Just make sure your wire isn’t too flimsy.
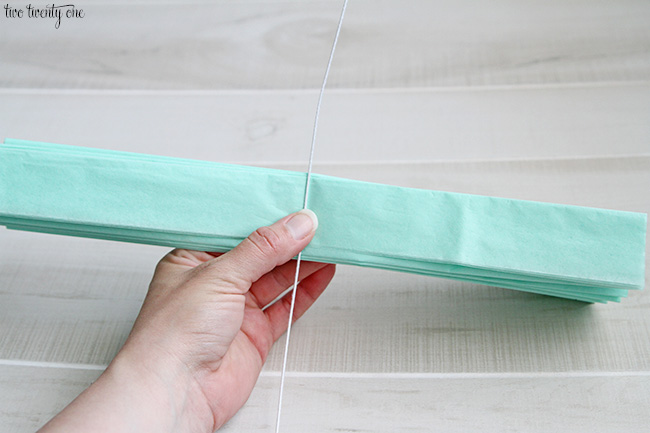
Twist the wire tight.
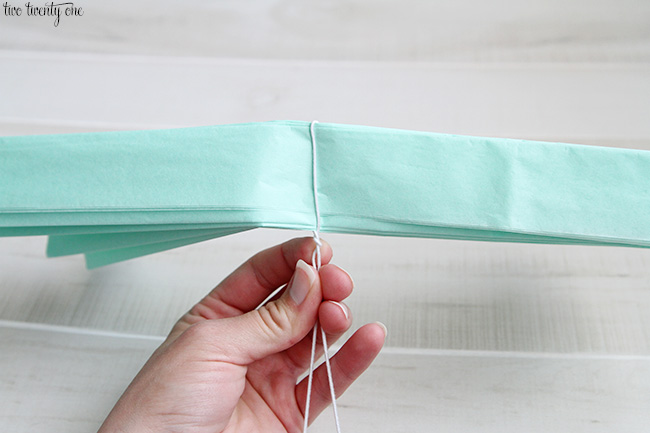
Then, grab your scissors and round out the corners of the tissue paper.
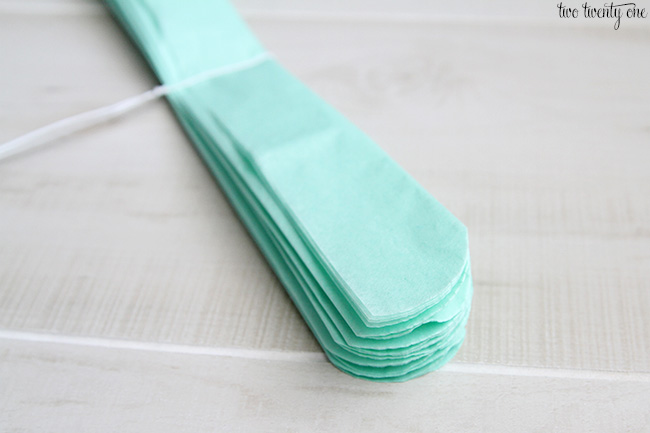
The end result should look like this when fanned out.
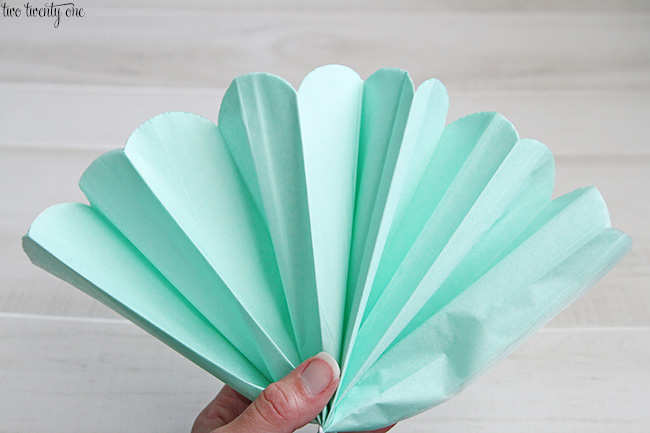
Start GENTLY, I repeat, gently pulling the top layer of tissue paper up and toward the center. Remember, this is thin tissue paper, not metal. It will rip if you’re too forceful with it. It helps to start pulling at the bottom of the tissue paper layer, not the tip.
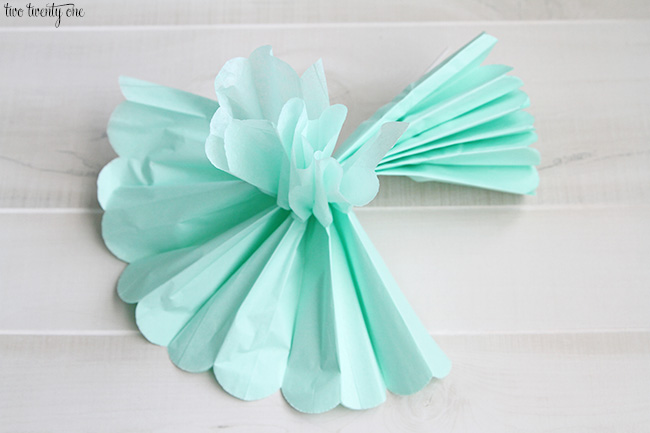
Next, bring the top layer of the other side up and to the middle.
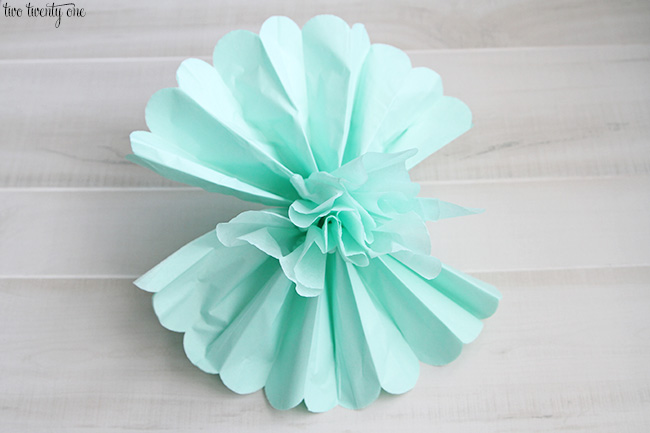
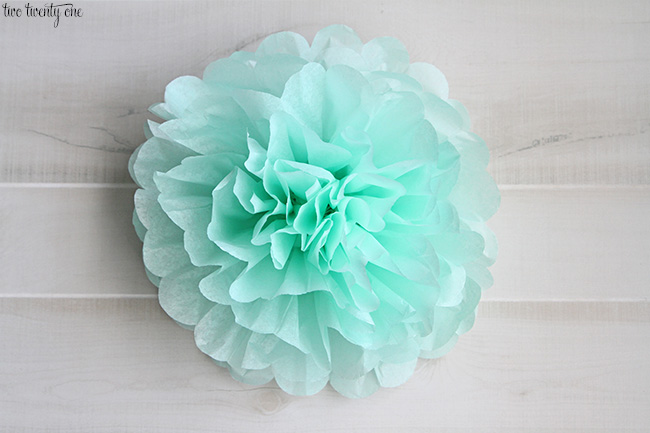
Now, repeat until all 5 layers are fluffed. Bend the wire so the tissue paper pom-pom lays flat. Cut if necessary. Or if you plan to attach the poms to something, leave the wire the way it is. You can just wrap the wire around whatever you’re attaching the pom to.
Note: If you happen to tear a piece of your pom-pom while making it, don’t freak out. It’s not the end of the world. A lot of the time it will just blend in. I usually grab my scissors and cut it a little so it doesn’t look so jagged.
If you don’t care about having varying sizes of poms, just make 4 medium sized poms. If you want fuller poms, use more than 5 layers of tissue paper.
Remember, practice makes perfect so don’t get discouraged if your first couple pom-poms don’t turn out correctly.
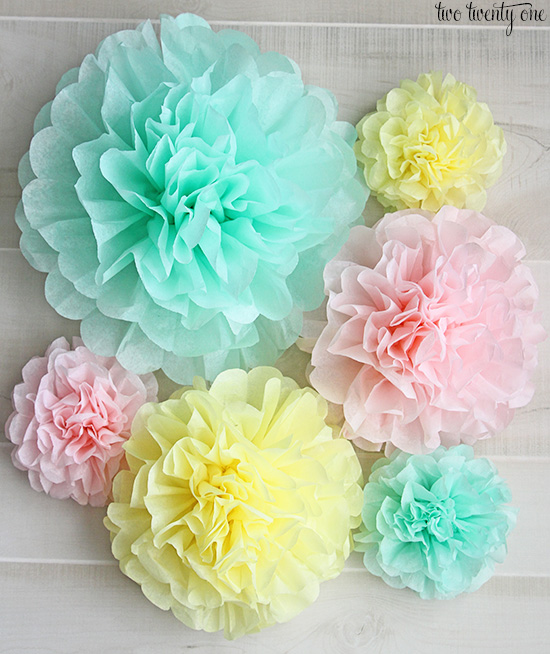
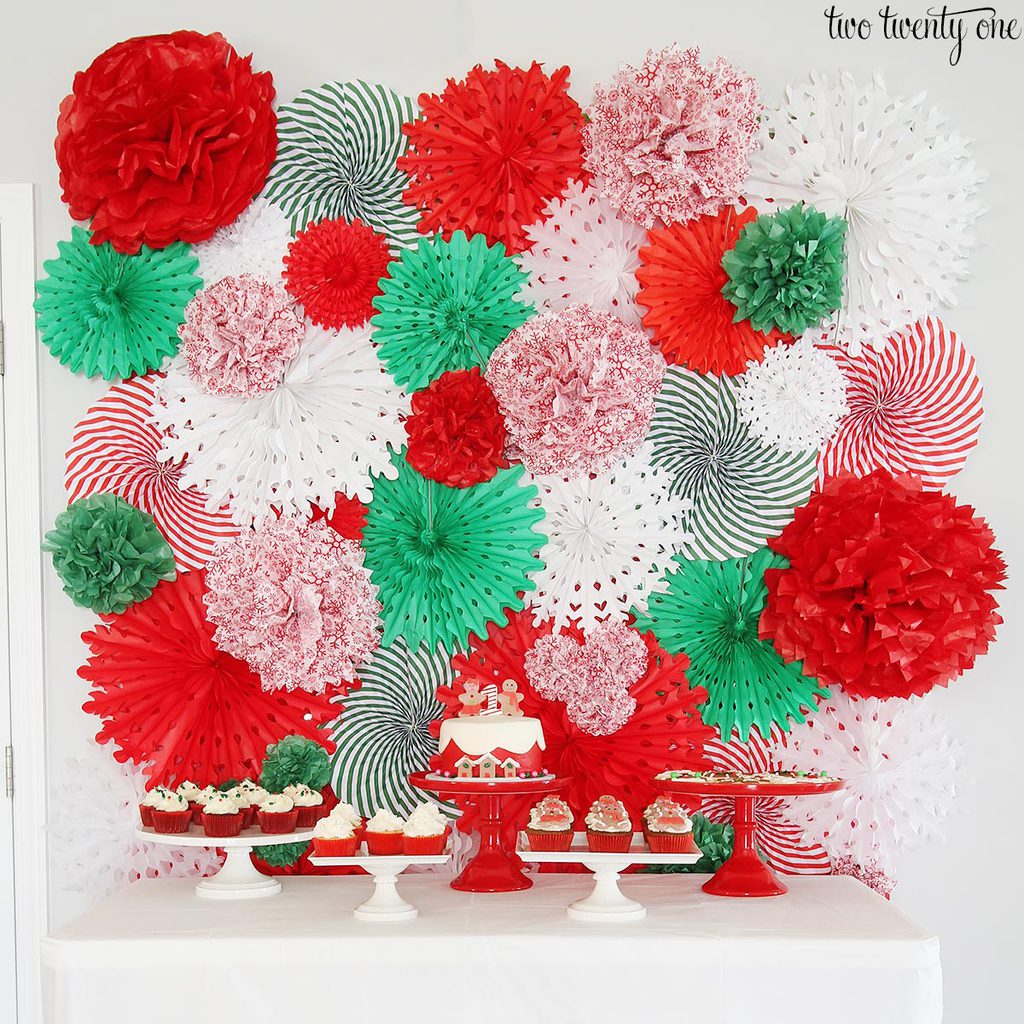
You can use the tissue paper pom-poms to decorate for a bridal shower, baby shower, wedding, birthday, or for any party decoration! The possibilities are endless. I used them on our dessert buffet and as a centerpiece for our dining room table. You can check out more photos of our gender reveal party here.
Find out how to make a tissue paper pom-pom and fan backdrop here!

Step-by-step tutorial on how to make tissue paper pom poms. Lovely and inexpensive party decorations!
- 1 10 sheet package 20-inch by 20-inch tissue paper
- 1 package white floral wire
-
Flatten out the tissue paper. Divide the 10 tissue papers into half-- so 5 and 5 in each stack. Set one stack to the side.
-
Fold the tissue accordion style.
-
Once folded, cut the strip into two pieces. One should be 6 inches. And the other should be 14 inches.
-
Take the 6 inch piece. Fold it in half hamburger style (if you don't know what I mean, Google "fold paper hamburger style").
-
Cut it along the fold, so you will have two sections with 5 sheets of paper in each section. Since these will be the smallest pom-poms, I refold them, accordion folds style, only smaller than the original fold (see photo after the photo below).
-
Grab the other remaining section that you put to the side in the beginning. Fold it accordion style. Cut it in half so you have two 10 inch pieces.
-
In the end, you should have the following from one package of 20 inch by 20 inch, 10 sheet tissue paper.
1- 14 inch
2- 10 inch
2- 6 inch -
The next steps are to be repeated for each section of tissue paper.
Grab your floral wire, center it in the middle of the tissue paper (use the ruler if you aren't good at eye balling-- no shame).
-
Twist the wire tight.
-
Then, grab your scissors and round out the corners of the tissue paper.
-
Fan out the tissue paper on each side. Start GENTLY, I repeat, gently pulling the top layer of tissue paper up and toward the center. Remember, this is thin tissue paper, not metal. It will rip if you’re too forceful with it. It helps to start pulling at the bottom of the tissue paper layer, not the tip.
-
Next, bring the top layer of the other side up and to the middle.
-
Now, repeat until all 5 layers are fluffed. Bend the wire so the tissue paper pom-pom lays flat. Cut if necessary. Or if you plan to attach the poms to something, leave the wire the way it is. You can just wrap the wire around whatever you’re attaching the pom to.
If you happen to tear a piece of your pom-pom while making it, don’t freak out. It’s not the end of the world. A lot of the time it will just blend in. I usually grab my scissors and cut it a little so it doesn’t look so jagged.
If you don’t care about having varying sizes of poms, just make 4 medium sized poms. If you want fuller poms, use more than 5 layers of tissue paper.
Remember, practice makes perfect so don’t get discouraged if your first couple pom-poms don’t turn out correctly.
Want to save this post for later? Pin it here:
Love tissue paper pom poms! They are such a cheap, easy and good looking party decoration!
They look so cute! I’m definitely going to make some for my sister’s bridal shower in a few weeks!
These look so cute, and what a great tutorial! Thanks so much!!
Truly lovely!
Hey! Love these and currently making them. But what is hamburger style? I’m stuck there . My husband says he thinks you refold the 6″ piece then cut it. I took from the directions that you fold it in half like a taco , cut , then refold. If you fold the 6″piece in half then cut you have 2 3″ pieces. Please help! Thanks so much .
Never mind ! I did it! They are awesome
Yay! Glad you figured it out!
You should be specific and edit it to say, unfold the paper you accordian folded, and THEN fold it hamburger style.
Thank you for this! I was stuck and your comment made it clearer
So what does it mean?
Will they be flat on one side or fluffy on both? I’m hanging mine from the ceiling and stuff and want an all around fluff!! HELP
These are made to be flat on one side. There’s full all around tutorials out there though. Best of luck!
Love these! So easy but so effective…great color choices!
I am making pom poms for a baby shower. my small and medium pom poms are coming out perfect, but when I try to make a large one it does not come out right. There is a gap on the sides and it looks like layers instead of being fluffy like I see yours and many others I have seen on tutorials. I am using 20×20 sheets. Please I need help. I don’t know what I am doing wrong when I try to make larger pom poms.
Hmmm, maybe use more than 5 sheets since you’re using larger tissue paper. The more stacked sheets you use, the fuller the pom poms will turn out. Try 8-10 sheets of tissue paper for the larger pom poms. Hope this helps!
Seems to be a silly question…but since these are rectangular sheets of tissue paper and not square, what size tissue paper do I use for 14″ pom poms?
Thanks
Oops, make that 16in x 10in.
The tissue paper I used are square– 20in x 20in. The large size pom-poms are about 12in in diameter so instead of 14in x 10in you’d probably want to do 16in x 10in for a 14in in diameter pom-pom.
I love the colors you used, but I can’t find them 🙁 which store should I go? I;m specially looking for the mimosa yellow. Thanks for your help.
Hobby Lobby
i was wondering how you mounted these to the wall?
I am wondering the same thing!
I didn’t mount them to a wall. They’re laid on wood surfaces in the photos.
Help please,
I just love them but having trouble to bring them to a ball . The ends are not getting together and there’s a gap like it want close and come to a ball shape. I’m using 20x20or20x26 paper, what I’m doing wrong?
Thanks
These are designed to be balls. They’re designed to be flat on the bottom so they can lay flat. Here’s a tutorial on how to make them into balls: https://www.youtube.com/watch?v=F2uVnIcAMm8
Hope that helps!
Did you get the mint green tissue paper at Hobby Lobby? I can’t find it anywhere =(
Yeah, I got it at Hobby Lobby. They may have discontinued that color, seeing as they changed the price of the tissue paper and quantity in the packages as well.
Really lovely,going to make some for my nieces wedding
I don’t understand the part where you fold the 6″ hamburger still?
This should help: https://www.youtube.com/watch?v=YLitdH0U_qM
Oh ok thanks…hopefully I do it correctly lol
Figured it out thanks. So for anyone who wasn’t to sure like me you need to reopen it the. Fold it in half then cut it to you end up with 2 pieces that measure 6″ x 10″. Just finished a few small ones and their so small and cute can’t wait to decorate for our baby girls 1st birthday this weekend.
I’ll follow discussing the kinds of passive revenue streams
that I am taoen with growing.
I was surprised to see these are still being made. I was 15 yrs old when I stood in my cousins wedding and we made them for decorations for her Bridal Shower. I am now 71 yrs old so you know they have been around for many years. They made a gorgeous pom poms,.
Not only did the tissue paper go up to $1.29 there are only 8 sheets in a pack now!!
Yep, I mentioned that in the post. Not cool.
Party City has tons of color options for people looking for something specific, and Dollar Store probably has the cheapest tissue paper! Love these pom poms! Thanks for sharing!
These are so pretty and remind me of spring. Thank you for the tutorial!
So cute! I actually make things like this a lot as I run Hen / Bachelorette parties 🙂 Love the colours you chose. I just discovered your blog via the Home Work link up!
http://www.hellonancy.co.uk
So cute! Will be making these for my Daughter’s upcoming rainbow themed party x
Looks super festive! Great little girl party idea. Glad I have a huge collection of tissue paper!
They’re so pretty, I have to DIY these for my next event!
I’ve always wanted to try to make paper pom poms, these are beautiful! Thank you so much for submitting your project to this week’s Monday Funday Party. We’re featuring your project this Sunday!
I love this tutorial! I like how the pom poms look as wall decoration and as a centerpiece! Thanks for sharing this tutorial at Motivation Monday on Mom Home Guide! Your project was picked as a feature this week!
Oh these colorful pom poms totally make me happy! I love their colors and their fluffiness. Thanks so much for sharing your creativity at the The DIY Collective this week! Please come back next week to show off your latest project!
Have an awesome week!
~ Ashley
Would this still work with paper that’s 16.5 X 24?
These are so, so pretty – will definitely be doing this for my next party.
Pinned here for future reference:
https://www.pinterest.com/pin/191332684147941971/
Cheers!
How do you make the ones to hang on string from ceiling that is a flower on both sides , not flat on one side?
Gonna give these a shot!!!Fingers crossed…
Hi blogger, i must say you have very interesting content here.
Your page should go viral. You need initial traffic only. How to get it?
Search for; Mertiso’s tips go viral
I got what you mean, appreciate it for posting. Woh I am delighted to find this website through
google.
That is a really good tip especially to those fresh to the blogosphere.
Simple but very precise info… Many thanks for sharing this one.
A must read post!
Can you tell us more about this? I’d love to find out more details.
Please let me know if you’re looking for a author for your blog.
You have some really great posts and I think
I would be a good asset. If you ever want to
take some of the load off, I’d really like to write some content for your
blog in exchange for a link back to mine. Please blast me an e-mail if
interested. Regards!
I would like to thnkx for the efforts you have put in writing this blog.
I am hoping the same high-grade site post from you in the upcoming also.
Actually your creative writing skills has encouraged me
to get my own blog now. Really the blogging is spreading its wings quickly.
Your write up is a great example of it.
I got this web page from my buddy who shared with me regarding this website and now this time I am browsing this site and reading
very informative articles at this time.
Ooo! I am throwing a baby shower in a few weeks and I have been wanting to make these but did not know how. Your directions are so clear and the pictures are great – I am sure I can figure it out now!! Thanks!
Love this!!! I thinking about my daughter’s college dorm room.
Beautiful ! I’ll make one to wear following your diy tutorial.
I just made a beautiful fluffy two-sided (round ball shaped) one out of a single pack of the Hobby Lobby paper that’s 8 sheets of 20 x 20 inch paper–cut the opened stack of 8 sheets in half, so you have two stacks of 8 sheets that are 10 x 20 inches. Then cut 5 inches off of both stacks and put one on top of the other (you can use this to make two little ones), so that you have a single stack of 16 sheets that are 10 by 15 inches. Accordion fold, fasten in the middle with wire, and unfold just like the half-ball shapes, doing one side then the other. Makes a very nice, good sized fluffy one.
No one can identify that it’s made from a piece of tissue paper. So clean and beautiful, thanks for the cutest DIY tip 🙂
WOW, these are amazing and so cheap to make! I bought these and was so confused how to make them for my daughters birthday. I wish I had seen this sooner but I will be trying this next time!
Stumbled upon this blog post and I’m sooo glad I did. Thank you so much for sharing this easy DIY!