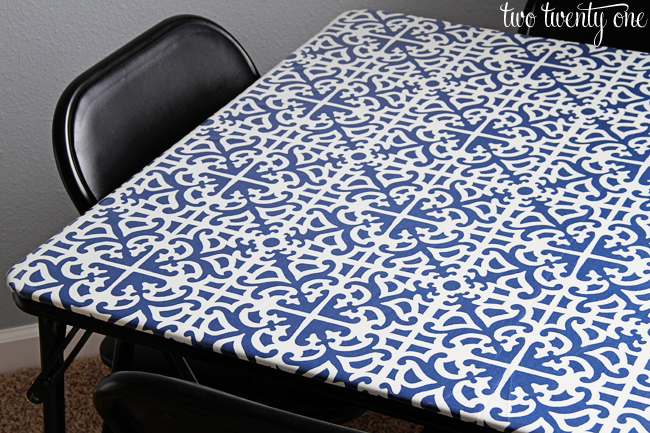
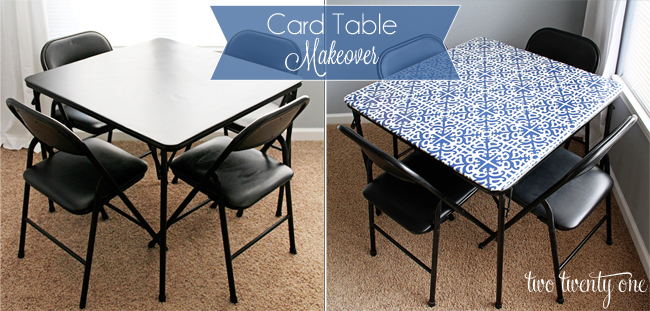
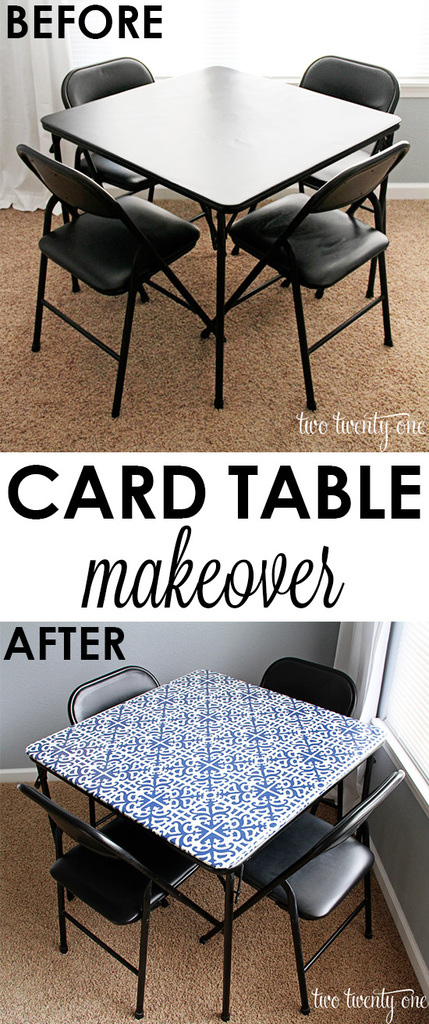
Card Table Makeover
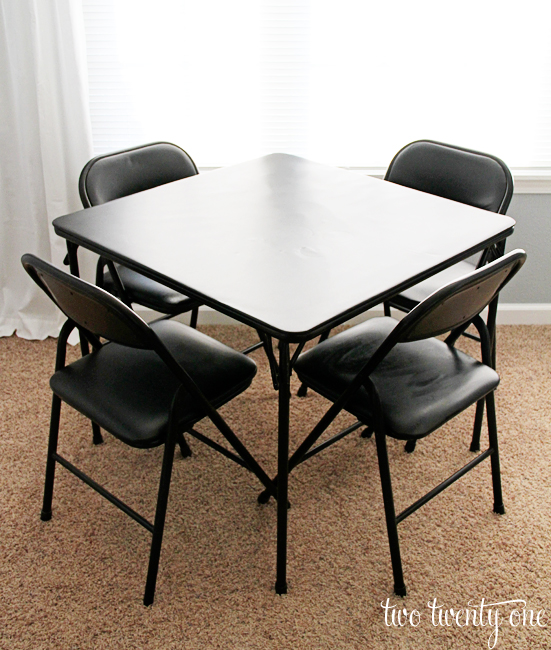
Card tables are boring. Here’s our snoozefest of a black card table and chairs. These definitely wouldn’t leave an impression at a potluck.
Start by flipping the table on its top and removing the screws.
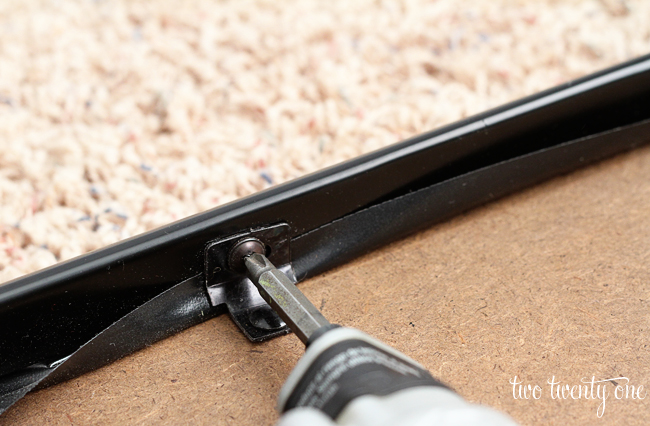
Then, pull the black vinyl off the table top. Try not to let your staples fly everywhere.

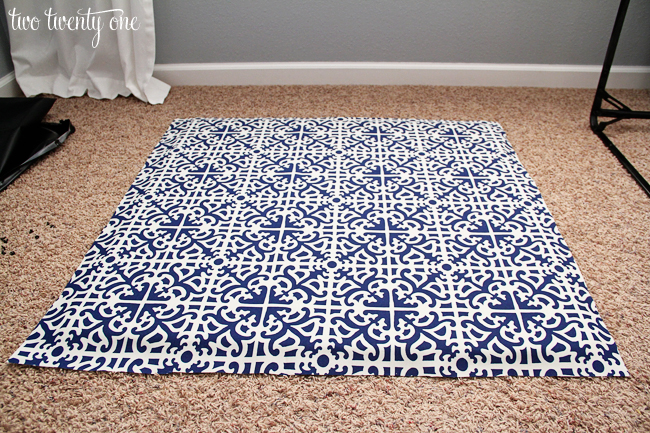
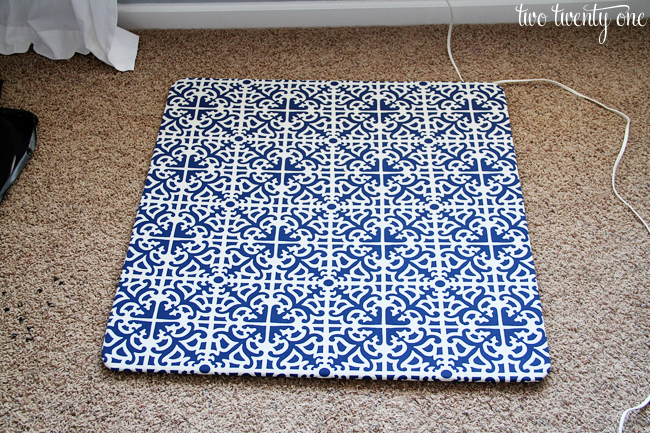
Flip the table top over. Lay your fabric on top of the thin layer of padding. Situate your fabric accordingly. This will be more difficult if you have a large, symmetrical pattern– keep your tape measure and sanity handy.
Once you have your fabric aligned, flip the table top over and begin to hot glue the fabric. You can staple the fabric, but I felt more comfortable hot gluing the fabric.
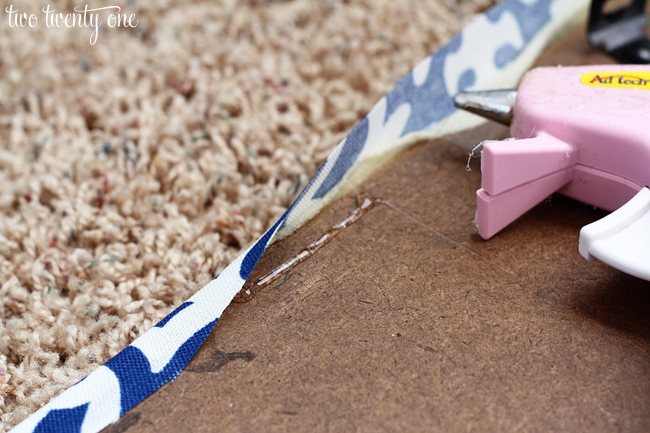
Flip over your table top once you’ve glued down the edges of the fabric.
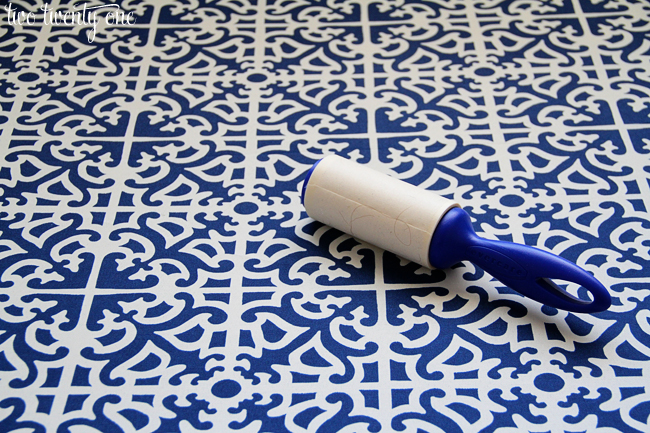
Optional: lint roll your fabric. Recommended if you own a shed-tastic dog or cat.
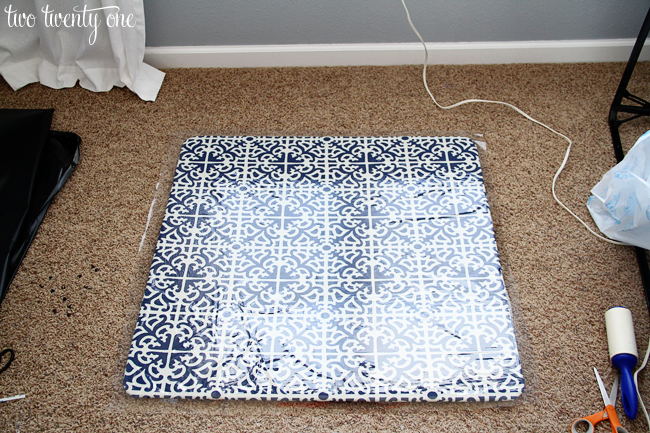
Grab your vinyl, lay it on your table top, and trim it so there’s about an inch of overhang.
I bought one and a half yards of 4 gauge clear vinyl from JoAnn Fabric. I believe it was $3-4 per yard. I used a 40% off coupon so I got mine for less than $5. Use those 40% off coupons, people.
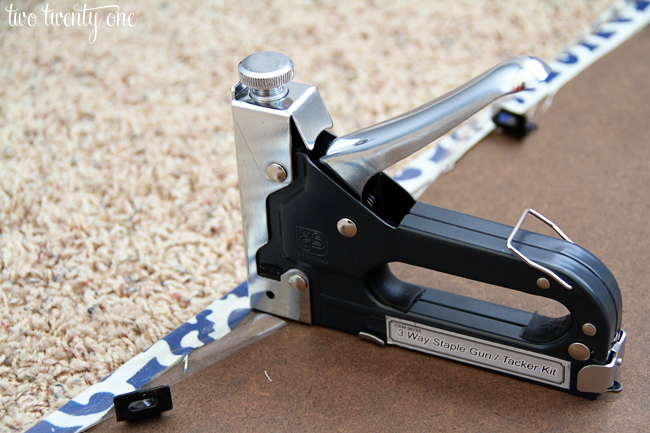
Flip the table top over again. Staple the edges of the vinyl to the bottom of the table top. Make sure your staples are the appropriate length.
Once you’ve stapled down the vinyl, flip over the table top, and reattach the table top to the frame with the screws. And you’re done!
Your revamped card table will be the talk of Bunco, bridge, Pinochle, or whatever it is you play with your peeps.
And because everyone loves a before and after side by side image.
Such a cute creative idea!!! I found your blog through I heart organizing, and I love it! My husband and I just bought our first home, and I’m looking forward to doing some diy projects that I’ve seen from your blog! Especially the stenciled filing cabinet can’t wait!! Thanks for your fun creativity!!
carefreeblonde.blogspot.com
Looks awesome! I am slowly starting a blog (finally) and did my first official Pinterest Challenge- a sunburst mirror!
http://blogindesign.blogspot.com/2013/02/pinterest-challenge-winter-2013.html
OH MY GOSH!!! I absolutely love this! Awesome job!
I love this! Totally pinning it! This would be perfect for a spare room in our house that I want to be able to do crafts and projects in, but still easily move the table out when someone needs to stay. I also have a million things I could do with that clear vynil.
I have a kind of unrelated question for you… I started a blog last month and I just have a little point-and-shoot Nikon that I used for all my pictures and I know they look terrible. I don’t really have a huge budget for a really nice camera but I’ve seen a couple “real” cameras for under $200. Do you think it would be worth it for me to get one of those or am I better off waiting and saving up for a really good one? Are there any that you recommend for someone who knows nothing about photography? Ever since you answered you Bloggiversary questions I can’t stop thinking about how terrible my pictures are!
Fancy schmancy! The inner elderly lady in me is digging this. I don’t own a card table. I keep thinking about getting one and then have guests at our coffee table instead.
I love this idea! So perfect for Passover! I am going to totally share this on my facebook page. Thank you!! http://www.facebook.com/not2shabbey
This is fantastic! Perfect for large family gatherings like mine. Thanks for sharing 🙂
That is awesome! Now I totally want a card table for our parties and things, just so I can dress it up a bit!
Before I host the next holiday I am so doing this. It will eliminate anyone pulling the over sized table cloth off when it gets stuck between their knees and they stand up. Not to mention it looks really pretty so I’m pinning it.
Bliss
I’m doing the challenge too! Just updated my post. I love this idea for the card table! It looks great. I definitely need to do this for our Bunco group! Maybe instead of playing one night, we’ll re-do all of our card tables 🙂
OK, this is seriously awesome … we’ve got an old card table I might need to spiffy up!! 🙂
I AM TOTALLY DOING THIS. Seriously. Brilliant. It’s actually perfect because my card table is all ripped up so it totally needs a makeover anyhow. And I totally want to make the chairs match, too. And spray paint it all. OhmywordI’msoexcited.
This really looks great. Such an improvement. And it looks sort of simple. At least not terribly long-term of a project.
So cute, girl!!!!
It looks great! I wouldn’t have thought of adding the vinyl!
And tell me that your table will see a little euchre action. No one down here has even heard of euchre… and I miss it!
What a great idea!! So simple and it makes such an impact! Looks amazing!
Looks amazing girl. Love that fabric too!
OOooh, I LOVE this! I’ve toyed with the idea of doing a small kids’ table for when family comes over, or even just for Forrest to play with/do his art/etc, but they’re never very cute. Or if they are cute, they cost a million bajillion dollars. This would be an awesome way to have a mess-proof kids’ table, too. I love it, and that fabric is perfecto!
Such a great idea and tutorial. I may have spray painted all over my pops’ table when I should have used newspaper. This one I will surely tackle before he finds out.
I made a drum shade for under $5, check it out here: http://blackandwhiteobsession.blogspot.com/2013/02/pinterest-challenge-drum-shade.html
I love that fabric & it does such a great job of making a cheap table look expensive!
Sarah
I love that Waverly fabric! What a great update.
Very cute!!
I have that EXACT card table and it sits in my basement. I am definately doing this and moving that baby to my new office area. Great idea! 🙂
Great project! It’s the perfect way to dress it up a bit! Now I want to play some cards…
I love this card table! You did a great job classing it up!
I found you though a bunch of mutual blog friends and I am so glad I did! NEW FOLLOWER! 🙂
Um…is it wrong that I want to do this to my small eat-in kitchen table?!? So cool!
Wow, this looks amazing! Love it. 🙂
Pinned it! My husband says that we HAVE to do this now haha.
Oh my gosh! This is awesome! I’ve pinned a couple of card-table makeovers too, and you make it look easy 🙂 And I love the fabric you used – Waverly is amazing 🙂
I love everything about this! Especially for a table that sits out for puzzles or crafts. I’m new to sewing and I didn’t know about clear vinyl! I love that it gives you more options for patterns.
This looks so great! I am pretty sure I have that exact same table and have been considering covering it too. So glad to see it come out so well. Would you consider linking this to my Pinworthy Projects Party?
I love this idea. And especially since my card table was once the stomping ground for my 5 year olds coloring and painting. The entire top is full of paint and other things that stain. This would totally make my card table new and fresh. Thanks for sharing!!!
Jessica
I have got to try this – so cute! BTW – I have an iPad KIC Mount giveaway going on right now if you would like to come enter. http://eatcakefordinner.blogspot.com/2013/03/ipad-kic-mount-giveaway-and-review.html
This is super cool! I’ve never seen anyone do this before!
We had a card table at church that the legs were loose. Also sat a hot pan on a vinyl tablecover during a church luncheon. We used the good end of the ruined vinyl tablecover and cut it to fit the card table. Recovered the table top, spray painted the legs to cover the scratches and dings, had my husband tighten up the legs and it looked like a new table. So for $4.oo to replace the melted tablecover, and $3.00 for the spray paint, the church got a new card table. Blessings all around. Also invested in a few trivets for the table so we don’t melt anymore tablecovers!
Unquestionably consider that that you stated. Your favourite justification
seemed to be on the web the easiest factor to be aware of.
I say to you, I certainly get annoyed while other folks consider worries that they
just don’t know about. You controlled to hit the nail upon the highest and also outlined out the entire thing with no need side effect , people can take a signal. Will probably be back to get more. Thank you
This just inspired me to offer a new addition to my vinyl business – vinyl table coverings. This is such a nice way to jazz up your table and add personality.
Large diamonds dont necessarily have to be white; there are
diamonds available in a range of colours. So you hazve to be extra cautious while choosing the wedding rings.
Thhe cost-slash is unbelievable, yet the ring stunns all.
I did it! Thanks for the tutorial! 🙂
I recovered the table and I love it. Thank goodness for your advice to hot glue down the fabric first. I also hot glued down the vinyl because i could not get the staples to go in. What kind of stapler do you have and did they go in good?
This looks amazeballs!! What a fabulous idea!
NICE BUT IF THERE ARE SPILLS OR CLEAN UPS? THEN WHAT DO I DO????? HAVE TO UNSCREW AND RIP THIS OFF? NO THANKS, I’LL STICK TO EITHER CONTACT PAPER (WHICH IS WHAT I THOUGHT THIS WAS…..) OR LEAVE IT BLANK! CUTE FOR A DAINTY PARTY THOUGH! BUT NOT AS A DAILY SET UP!
You must not have read the tutorial very well. There’s a layer of clear, 4 gauge vinyl that is on top of the fabric, which is easy to wipe clean.
I love this! I actually bought the fabric and vinyl to do this to the top of mine before looking up the idea online. So excited to see I wasn’t the only one to try this 🙂 My question is, where did you find the staples? I can not find any staples that are short enough. Did you trim them or buy specialty staples?
Great idea! We have the same boring card table sitting in our garage. I may just have to borrow this idea. Visiting from DIY Sunday Showcase link party.
I love this. I have a card table that is in much worse shape than yours. I really need to give it a face lift!
What a brilliant idea. I’ve always wanted to do something to make our card table look a little more presentable. Thanks!
I love this idea! I have an old card table in the garage and I was just thinking that I need a table in my craft room! Now I know where I’m going to get said table and how I’m going to make it cute!
Tania
Wish I’d seen this before I took mine to the Goodwill – the kids, when young, had marked all over it with permanent marker. Yours looks fabulous, great idea you had and great job you did. Saw your link at Savvy Southerrn’s party.
Mary
Very Clever! I bet you just saved many card tables from being doomed! Well done! Blessings, Janet
This is really pretty. You did a fantastic job of covering it making it look pretty and making durable.
I normally don’t leave negative comments, but this is an exception.
I found your site through pinterest, I LOVE your idea and tutorial! Such a fantastic idea! Love love love it! I have already pinned and I will be trying this out on my own card table very soon! Thank you!
However, the advertising on your site is OUT OF CONTROL! Not only are there ads after Every Single paragraph and/or picture, there are ads ON YOUR PICTURES.
Requiring to close them all out if you wanted to even SEE the whole picture. ON EVERY SINGLE PICTURE.
I know selling advertising space on blogs/sites like yours are the primary source of income. And with your awesome idea(s) is wonderful that you can make money sharing your terrific projects!
AGAIN. I. LOVE. YOUR. WORK.
Well, at least this one. I haven’t actually looked at anything else you’ve posted, and with all the Ads everywhere it really makes it hard to want to check out your other stuff.
I hope you remove some (NOT ALL) of your ads. I absolutely FULLY support blogs/sites like yours. It would be so great to be able to check out the rest of your stuff with out having to play pounce-every-Ad-as-fast-as-you-can. Lol Best of luck! Again, I really do love this tutorial. ?