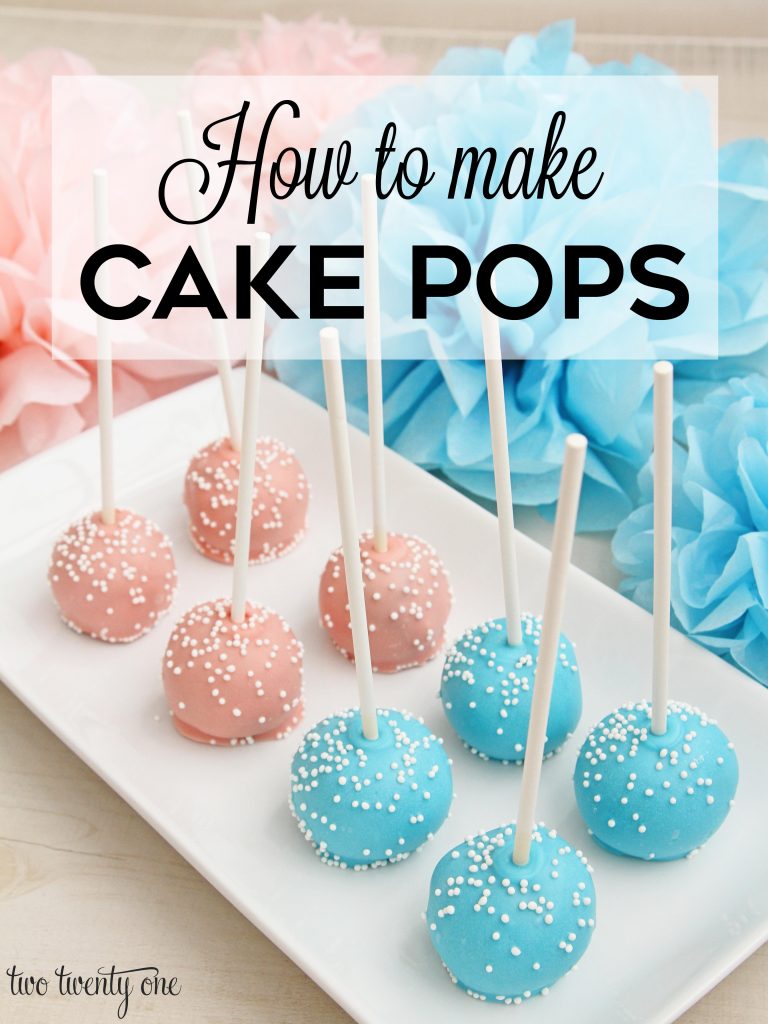
How to Make Cake Pops
How to make the perfect cake pops for any occasion!
I have to admit, I had never made cake pops before but I was determined to make them for our gender reveal party. I’ve made Oreo truffles multiple times, which are somewhat similar to cake pops. Somewhat. They’re essentially the cookie version of cake pops. Basically dessert cousins. I figured, how hard could it be?
I’m pleasantly surprised to report that making cake pops isn’t very hard at all. It’s not very time consuming either. Win-win.
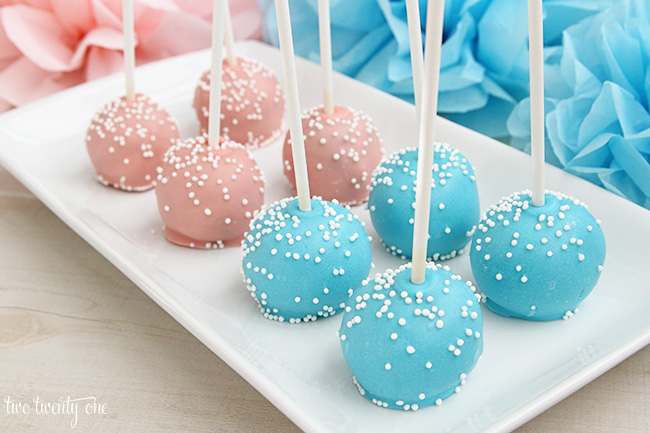
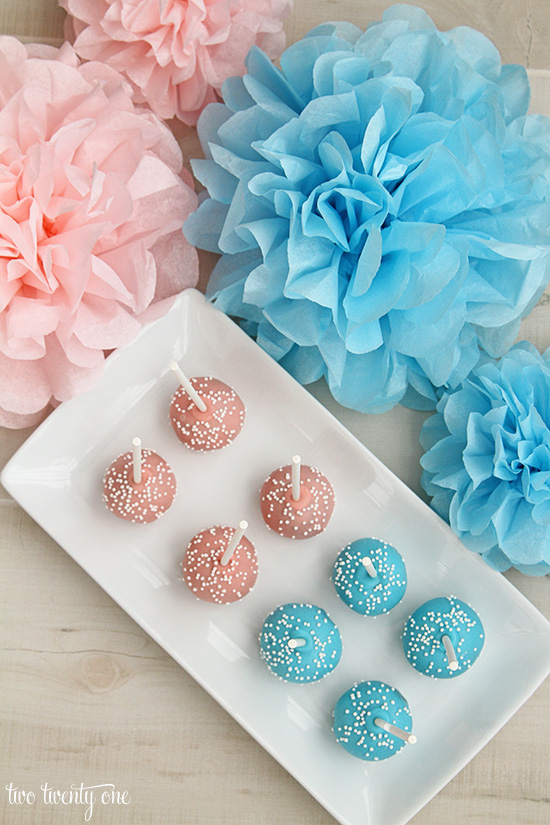
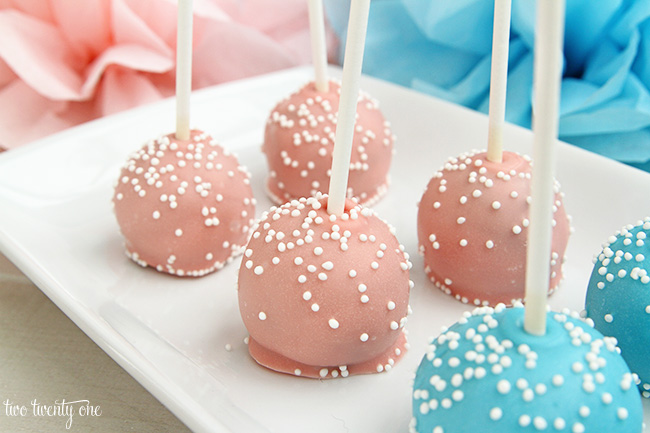
Now, I know mine aren’t 100% true cake pops– they’re basically cake balls with sticks in them, but people can still carry them around like cake pops. I mean, who wants messy hands? Anyway, I’ll tell you at the end of the post how to make them into legit cake pops with the cake portion at the top and the stick coming out the bottom.

Here’s what you’ll need to make the cake pops recipe:
cake mix + ingredients listed on the box
1/3 cup icing
Candy Melts (available at most craft stores)
6 inch lollipop sticks (available at most craft stores)
sprinkles (optional)
Make the Cake Balls
Prepare a boxed cake mix as directed on the box. Let the cake cool completely. Wash your hands. Next, crumble the cake into fine crumbs with your hands in a large bowl. Mix in about 1/3 cup of icing (I used store bought milk chocolate) with your hands. The mixture should be dense but not gooey. Gooey cake balls gross me out. Grab a cookie scoop (I used my 1.5 T scoop, which I LOVE). (Remember, everyone needs a cookie scoop, or 3.) Then, scoop out the mixture, packing the cake mixture into the scoop as you scoop it (I smushed the open side of the cookie scoop against the inside of the bowl). Smush the mixture in your hand to pack it tightly into a ball. Roll it into a nicely shaped ball. Roll the remaining mixture into balls (my cake mix made 18 balls).
The Coating Process
Grab your Candy Melts (I purchased mine from JoAnn Fabric) and a small microwaveable dish (I used a small oatmeal bowl). Put about 5 morsels into the bowl and melt them in the microwave. Next, grab your cake pop sticks (I purchased mine from JoAnn Fabric). Dip your stick into the melted Candy Melt and quickly stick it into a cake pop at least half way down. Repeat with remaining cake pops. Then, set pops on a cookie tray. Freeze for about 15 minutes (they wouldn’t fit in my freezer so I put them in the fridge for 30 minutes– worked fine). Put your Candy Melts into a microwaveable mug (I filled mine to the top). Next, melt the Candy Melts as directed on the package. Dip the cake pop into the mug, evenly coating it. Let the coating drip off. Place the pop on cookie sheet. Finally, if using sprinkles, add immediately before coating sets. Repeat for remaining pops.
Cake Pop Tips
These may seem like a lot a work, but trust me, once you have it all mapped out it’s a breeze. I spent maybe an hour on these (not including baking and cooling times).
If you want your cake pops to be true cake pops, rather than cake balls with sticks in them, instead of putting them on a cookie sheet to dry, insert the stick into Styrofoam for the coating to set. I wanted mine to sit on the platter but still be pops, so that’s why I went the route I did.
FYI, the Candy Melt coating is really good. I used chocolate cake and you barely tell there’s dark cake underneath the coating. Just thought I’d throw that out there.
Note: Candy Melts come in a wide array of colors. But if you don’t spot a color you need, you can use gel food coloring. Do not use food coloring drops.

Step by step instructions on how to make cake pops! Learn some tricks on how to accomplish delicious and eye-catching cake pops!
- 1 cake mix + ingredients listed on the box
- 1/3 cup icing
- Candy Melts
- 18 6 inch lollipop sticks
- sprinkles
-
Prepare a boxed cake mix as directed on the box.
-
Let the cake cool.
-
Crumble the cake into fine crumbs with your hands in a large bowl.
-
Mix in about 1/3 cup of icing with your hands.
-
Scoop out the mixture using cookie scoop, packing the cake mixture into the scoop as you scoop it.
-
Smush the mixture in your hand to pack it tightly into a ball.
-
Roll it into a nicely shaped ball.
-
Roll the remaining mixture into balls.
-
Put about 5 Candy Melt morsels into microwaveable bowl and melt them in the microwave.
-
Dip your cake pop stick into the melted Candy Melt and quickly stick it into a cake pop at least half way down.
-
Repeat with remaining cake pops.
-
Set pops on a cookie tray.
-
Freeze for about 15 minutes.
-
Put Candy Melts into a microwaveable mug.
-
Melt the Candy Melts as directed on the package.
-
Dip the cake pop into the mug, evenly coating it.
-
Let the coating drip off.
-
Place cake pop on cookie sheet.
-
If using sprinkles, add immediately before coating sets.
-
Repeat for remaining pops.
Check out my other popular recipes HERE!
Have you make cake balls or cake pops before?
How’d it go?

I’ve seen these around the web from time to time, but have never made them myself. Those, pink and blue, are just darling! Hope you have a lovely weekend!
I love cake pops, I make them the same as you! Standing them up in styrofoam was such a mess, I just plop them on a plate too. 🙂 dipping the stick in chocolate and then into the ball and then into the fridge /freezer is THE way to go. Don’t skip that step or else you will have cake balls, sans stick! 😉
Adorable gender reveal btw! Absolutley love the decorations!!
Those look amazing and easy!! Need to pin this!
Much simpler than I thought! And yours turned out soooo cute! What do the melting candies taste like? I wondering if it would taste better to use white almond bark and dye it the color I want…
The Candy Melts are vanilla flavored. They taste pretty good to me!
i use the almond bark for all the ones I do, I have tried to color it with food coloring and that didn’t work well, it changed the consistency of the chocolate and wasn’t smooth anymore, so the candy melts would probably work for color ones.
I know this super late but there is a coloring made specifically for candy coloring made by wilton. I got it from joanns and its 4.99 but I only paid half with the discount. The colors are very vibrant and go a long way.
You can’t use traditional coloring. If it is a water base the chocolate won’t take it they make special colouring for it that is oil based. Also if u are doing one or two colors not worth investing in the coloring.
Don’t use liquid color for coloring candy melts. Use gel type or Wilton paste type coloring, in very small amounts.
Try using Wilton’s food coloring ( its a gel)
I think they taste like the white almond bark with coloring already in them. The companies have gotten fancy over the years and added flavoring. It’s your preference but one less step of coloring is great for me. You can always add more coloring to make them darker if the melts aren’t dark enough for your theme. Have fun!
How many days in advance can u make these thank you in advance
me too
You can use any flavor of candy melts I recommend using vanilla but it’s up to you I made these and they are wonderful
I’ve learned the hard way that if you’re making them to stand up on the stick, don’t make them when the humidity is really bad out. Otherwise you’ll have a big mess and be frustrated.
Your cake pops turned out so cute!
These are so cute! I’ve always been intimidated by cake pops, but I think I could manage this! Definitely trying them for a party this summer!
I have always wanted to try to make cake pops but wasn’t sure about the icing part. I think these will be a good recipe to start with to learn the basics. Thanks for the great tips.
Love the sprinkles, where did you find them please.
JoAnn Fabric in the cake decorating section.
I have a cake pop machine I got on sale at Kmart for only $8 to try to see how I like it and I LOVE IT….makes it so easy and you end up with like 6 dozen small cake pops out of a cake mix…and they only take like 7 min to bake each batch
I also got a Wilton Candy Melt Pot $20 at Walmart and it makes melting the chocolate so much easier and the chocolate is perfect
Hi! I was wondering if your cake pops made from cake mix and baked using a cake pop maker stayed moist? I have a cake pop maker but I always find it a little dry inside.
LOL its been a while since i made them so I can’t remember…..maybe do a search on how to make cakes moist and see if you can change your recipe a little to help….sorry i wasn’t better help
No problem! Thank you!
Add 4eggs (most mixes use 3). Add a box of instant pudding (flavor to match cake) and add a packet of dream whip. Use oil and water according to box. I always use Duncan Hines mix. I have used this recipe for nearly 40 years. I used to do the Wilton shape cakes so I know it will hold its shape in your cake ball maker. My cakes are ALWAYS moist. Blessings!
I make these at Christmas with the white melts, then I stand them on top of a bed of crushed candy canes before I add the sorinkles. You end up with a pop that is decorated on both top and bottom. So cute. But if if you are using the crushed mints you need to let them dry on top of Reynolds non stick aluminum foil. The crushed mints can get sticky after they are unwrapped. Once the pops dry/set up there is no problem with sticking though.
The easiest way to “crumb” the cake into fine crumbs is to take 2 large chunks of cake, each roughly 1/4 of your 11″x13″ sheet cake and rub the cut sides back and forth against each other.
I haven’t made cake pops before [they seemed difficult!] but now I might have to try! And I do have a cookie scoop! 😉
Kendra, I made the cake pops today for the first time. I watched several videos before I started but I still had trouble with the pop falling off the stick. This is what they tell you to do. Take your stick, put the end in the melted candy then into the pop. Put them in the refrigerator for 15 min for the candy to harden . My advise is to also add the melted candy all the way around the stick then put in refrigerator .
We are having a candy shop party tomorrow. I have TONS of stuff to do! Can I make the cakes today, refrigerate, crumble & make the pops tomorrow? Any suggestions on starting today?
I made these a day or two before our gender reveal party and they were fine. After making them I put them in a container in the fridge. I had some leftover ones and they kept in the fridge for about a week. 🙂
I am going to make these for my daughters gender reveal dinner/party this weekend. Never knew how to make these until now-you have been so generous to post it!!! THX SO MUCH!!!!! Hope I don’t make a disaster of your recipe….if I do-i wont mention your name anywhere!!! LOL
Could you freeze them?
I have made these before and they came out so gooey! After reading your instructions I know know I used way too much frosting.. I think I’ll give it another shot after reading this. Thanks!
I have made cake pops for two weddings. Needless to say, we had to make a lot of them. We were trying to figure out how to allow them to set without having them all over my house. My husband came up with a brilliant idea of using a peg board that we put cans under to raise up to a perfect height.
I made brownie pops for a Super Bowl party we won.. Go Seahawks! They roll into balls easily no added frosting needed. Very fudgie. The rest of your instructions are what I did. I’m going to try the cake pops.
There’s a lot of brownie mixes. What brand / type of brownie mix did you use?
Yours turned out really cute! I tend to make more cake truffles/balls than pops but either way they are way too easy to eat!!! Happy New Year!
Cake pops intimidate me. These look totally doable! Thanks!!
I wanted one of those cake pop makers and got one for Christmas 2 years ago. It was the biggest mess and took a lot of time. I’ve only used it once. This seems much easier and quicker, without the mess. Your look great, I’ll have to try it your way.
These look so pretty ! Thanks for sharing – I’m off to pin because I see cake pops in my near future !
Happy New Year !
Wow these turned out so good and I love that you made them for a gender reveal! Thank you for linking up at The Wednesday Round Up and we hope to see you back next week partying with us!
These cake pops are super adorable! I’ve only make cake pops once before but I like your suggestion of using the ice scoop. Thanks!
Love that you used the cake pops as a gender reveal. I’m pinning onto my Baby Shower Pinterest board as my girlfriend is expecting and this would be so much fun!
I love cake pops so much, I actually got one of the special makers – works well and you can get so many done!! Thank you for sharing this with us at the #HomeMattersParty
I’ve not had good luck with making cake pops, so this helped a lot!
Thanks so much for adding your recipe to the Delicious Dishes Recipe Party on Pocket Change Gourmet!
~Liz
Does anyone knw if you old use those little cake donut holes, instead. Do you think they would hold
up o being put on the stick and dipping?
I would like to make about 400 of these for graduation. How long do you think this will take? Also how far in advance can I make them and freeze them? or will they stick?
I would think they could be made a month or so in advance and frozen. Or at least freeze the balls, then assemble the week of graduation.
A long time. One box of cake gives me 20 cake pops. But you can make the cake ahead of time. And make your balls and freeze them.
This is so helpful! How many bags of candy melts would you say you used for your 18 pops? I need to make about 100
1 pound of candy melts makes approx. 35 pops
They turned out great for my first try! I didn’t mush the first pop together enough and it broke in two..my husband had no problem eating the “mistake”! I used a fork for extra support for the first couple after that and the rest were fine. Thank you! I went to Hobby Lobby and bought several more bags of candy. I will be handing these out to friends snd family members!
I make lots of cake pops! !! But I don’t have luck with the candy melts. They are to thick and I can’t get a nice even coating. It’s all clumpy. I use this stuff from Kroger that comes in a tray. It comes in white or chocolate. Also I use a double boiler cause when I used the microwave my candy coating was hard. Any suggestions
Yes, I suggest using a electric candy melt pot! It makes all the difference in the world. After adding the candy melts turn it on high. Stir every 5 min. It should take about 15 min to get the candy smooth . Turn the setting on warm and it will stay smooth for 2 hrs. as you work on your project. ?
I think you are referring to almond bark. It’s used to make candy and coatings. That’s what I learned to use instead of those little chips. It’s more user friendly. It stays melted and smooth a long time before having to reheat.
I made my first attempt at cake pops and the instructions seemed easy enough; however, not so if you run into issues. The candy melts don’t often melt so that it “drips” when you dunk the cake into it. How do you get that affect? I noticed that certain colors are thicker than others. Also, the drying time from the time you dunk and decorate pretty much needs to be immediate. Any suggestions?
Hello, I’ve noticed on some other posts people use shortening to thin out the candy melts. Have you tried this method? I don’t have shortening on hand and very little time to run to the store. Just wondering your thoughts? Oh and can you use paper straws instead of candy sticks? Thank you!!
Hi! Is it possible to make the cake pops 2 days ahead before the party then put in the fridge?
Thanks very much
Yep!
The baking sheet may be the answer but was wondering about baking the cake in something other than the13x9 in order to cool quicker. To chancy on burning?
We recently had the “no” bake (no eggs) version and realized they tasted like edible cookie dough.
Hi, if using white chocolate instead of candy melts (they’re very expensive in the UK) Can I colour the cream before heating? Thanks
I’ve always been a little intimidated to make cake pops, but these sound super simple! Hopefully I can find some candy melts in the pantry to try these out today. Thank you!
May i check what icing did you use ? is it icing sugar or ?
I regard something genuinely interesting about your web blog so I saved to
my bookmarks. https://coveeskin.net/
I have trouble with cracked coating. Any suggestions?
I just made these for the first time and I also had trouble with my coating cracking on my first batch. The second batch I made worked much better. I dipped the sticks in the melted candy and put in the freezer for 15 minutes as suggested here, but then I let the balls come back to room temp, and let the dipping candy sit for a minute. The closer both are to room temp, the less problems you have with cracking. It worked great!
What’s up, after reading this remarkable paragraph i am too delighted to share my experience here with mates.
Yes!! I used Coloring and ruined everything it didn’t even taste good so now I have to go buy gel wish I would’ve read the comments first DUMB ME!!!!!
Loved all these recipes but pomegrenate molasses chicken was something that I was looking for. Will try out on this weekend on my newly bought instapot. Thanks for sharing the collection.water leak toronto
Are you trying to find powerful advertising that actually gets good results? I apologize for sending you this message on your contact form but actually that’s exactly where I wanted to make my point. We can send your advertising copy to sites via their contact forms just like you’re getting this note right now. You can specify targets by keyword or just execute bulk blasts to sites in any country you choose. So let’s say you need to send an ad to all the interior decorators in the US, we’ll grab websites for just those and post your promo to them. Providing you’re advertising some kind of offer that’s relevant to that business category then you’ll receive an awesome result!
Send a quick message to [email protected] for details on how this works