Dare to DIY Deck the Halls Features

There were so many amazing decked halls linked up on Monday!  You guys did an awesome job!

Today all of us (KimMichelleRachel, and I) are spotlighting three projects we loved.  We made sure that none of us spotlighted the same projects, so make sure you head over to the other chicks’ blogs and see if you were featured.

If pinning, please pin from the original source!

Trisha from The Sweetest Survival created this beautiful mantel.

Holly from Just Two Crafty Sisters made this gorgeous felt flower tree skirt.

Katja from Shift Ctrl Art put together this amazing tablescape.

Thanks so much to everyone who participated in the Dare to DIY series.  We had a great time checking out everyone’s projects.  And we hope you had fun creating your projects and checking out what others created.

Dare to DIY: deck the halls

Alright, let’s see your decked halls!

I’m thrilled to be co-hosting with Decor and the DogMaybe Matilda and  Newly Woodwards.

This week it’s Dare to… deck the halls!
DIY something new to deck your halls. Did you find something in a catalog that you wish you had? Wreaths, stockings, pillows or advent calendars? Make it! Inspire us all to do the same.

I shared my decked out card catalog vignette on Friday.

I also shared my sweater present tutorial on Saturday.

Kim created this awesome NOEL sign.

Michelle whipped up some pretty burlap stockings for her mantel.

Rachel shared her modern woodland vignette.

Each Monday, the link party goes live for that week’s Dare to DIY challenge. You can link up as many projects as you wish, as long as the posts correspond with the theme of the week.

You can link up on any of our four blogs listed above. The linky below will stay live through Wednesday. This Wednesday, each of us will spotlight at least 3 projects we loved from the week on our blogs. We’ll also pin those projects on our shared Pinterest board.

The only rules:
1. Please follow the Dare to DIY theme of the week (this week is ‘dare to be thankful’).
2. Please link back to Dare to DIY by linking to at least one of our blogs (or copy this: I’m sharing this at the Dare to DIY party hosted by Decor and the DogMaybe MatildaNewly Woodwards, and Two Twenty One!)
3. Please go to at least one other blog and comment. This is a party. So get to know a few other bloggers.


Dare to DIY Give Handmade Features

A big thanks to everyone who linked up to the Dare to DIY Give Handmade link up!   There were so many great projects that we decided to compile our favorites into one handy post.

Hopefully you can use this compilation to help you out with those last minute handmade gifts.

 House Drawing by Planting Sequoias * Card Table Playhouse by Anything Pretty

Dog Silhouette by A Peachtree City Life * Wine Gift Bags by Bowl of Cherrys

Wine Cork Trivet by B&B Build a Life * Christmas Joy Felt Pillow by Our Next Great Adventure

Owl Coasters by Boxy Colonial  * Vanilla Brown Sugar Body Scrub by Wills Casa

Sharpie Mugs by Shannaigans * Travel Jewelry Holder by Naptime DIY

Gold Leaf Agate Coasters by Desert Domicile * Lilly Doll by Home in the Country

Festively Red Spread by Little Rays of Sunshine * R2D2 Stocking by Creative Chaos Art

Geometric Necklace by Ceci Bean * Mason Jar Snow Globes by The Sweetest Digs

Woodbead Necklace by Decor and the Dog * Crochet Blanket by Maybe Matilda

Dish Towels by NewlyWoodwards * State Necklace by Two Twenty One

We will be pinning all of these handmade gifts to the Dare to DIY Projects board.  You can also find all of the co-hosts on Pinterest: Decor and the Dog, Maybe MatildaNewlyWoodwards, and Two Twenty One.

Are you ready for next week’s Dare to Deck the Halls Challenge?

Dare to DIY: give handmade

Alright, let’s see your handmade gifts!

I’m thrilled to be co-hosting with Decor and the DogMaybe Matilda and  Newly Woodwards.

This week it’s Dare to… give handmade!
DIY a gift made by you. Nothing is more special to give than something you created, so share projects that will be go in brown paper packages this holiday season. Ideas include bath and body items, kitchen gifts, hand-sewn clothing or home decor.

I shared my DIY state necklace on Friday.

Kim made pretty dish towels for her co-workers.

Michelle created a lovely wood bead and ribbon necklace for her mom.


Rachel crocheted a beautiful blanket for her bed.

Each Monday, the link party goes live for that week’s Dare to DIY challenge. You can link up as many projects as you wish, as long as the posts correspond with the theme of the week.

You can link up on any of our four blogs listed above. The linky below will stay live through Wednesday. This Wednesday, each of us will spotlight at least 3 projects we loved from the week on our blogs. We’ll also pin those projects on our shared Pinterest board.

The only rules:
1. Please follow the Dare to DIY theme of the week (this week is ‘dare to be thankful’).
2. Please link back to Dare to DIY by linking to at least one of our blogs (or copy this: I’m sharing this at the Dare to DIY party hosted by Decor and the DogMaybe MatildaNewly Woodwards, and Two Twenty One!)
3. Please go to at least one other blog and comment. This is a party. So get to know a few other bloggers.


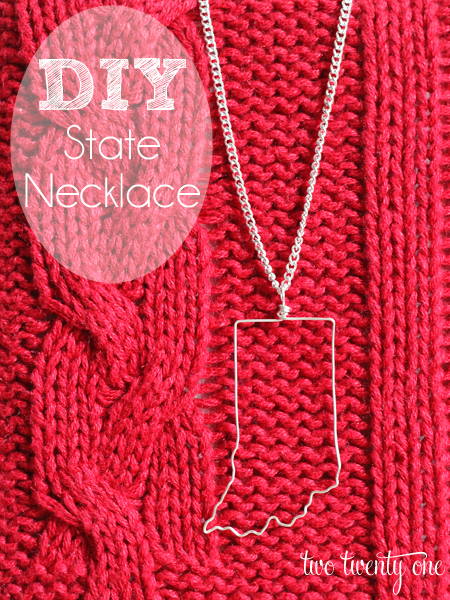
How to Make a State Necklace {DIY}

I’m pretty sure many of you have seen those state shaped necklaces floating around the Interweb for the past couple years.  I’ve looked into them and debated purchasing, but the $50+ price tag always gets me.  Don’t get me wrong, I support handmade items, but I’m a cheapskate when it comes to certain things (she get it from her momma), especially things I can DIY.  When I start making my millions I’ll by handmade like it’s my job.  Until then, I’ll save my $50 for our electric bill and attempt to make my own.

In attempt to make my own state shaped necklace, I did a little researching last night and found a great tutorial on the blog, V Juliet.  I had everything I needed so no trip to the store was necessary.
Cha-ching.

Here’s what I used:
22 gauge wire (JoAnn)
round nose pliers (JoAnn)
wire cutters (JoAnn)
masking tape
outline of Indiana (found here)
card stock (Walmart)
chain necklace (Etsy)

I started by searching Google images for an outline of Indiana.  Then I scaled down the image to 2″ by 2″ in Photoshop and printed it onto card stock.  I grabbed my wire and made a loop at the top for the necklace with my round nose pliers.  My loop wasn’t made using a specific looping method.  But if you YouTube search “simple wire loop” you’ll find a bunch of examples.   Plus, it’s easier to watch a video than to try to decipher photos.  Make sure you make a big enough loop to feed your necklace through.

After I made my loop, I started to trace my Indiana shape with the wire and my round nose pliers.  I used masking tape to secure the wire as I went along.

For the Ohio River part of my state, I gently bent the wire with my round nose pliers.  Sometimes I would hold the wire in place with the pliers and bend the wire with my free hand.  Trial and error, people, trial and error.

Be careful when doing twists and turns.  If you put too much stress on the wire it will snap.  Here’s your proof:

After tracing the state, I removed the masking tape.  Then I made a couple loops around my original loop and cut the wire with my wire cutters.  Since I was putting this on a necklace, I gently turned my loop to face the opposite direction so the pendant would look right once I fed the necklace through the loop.

Full disclosure:  I ended up making five Indiana shaped pendants.  Proof that not all bloggers get it right the first time.  The pendants are placed in chronological order– from first to last attempt.

More disclosure: it took me 5-10 minutes to make each pendant.

I like how the rose gold looking pendant (#2) turned out, but I didn’t have a matching necklace on hand to go with it, so I decided to make a sterling silver plated one.  I finally got it on the third try.  I envy all of you who live in states like Colorado.

It turned out pretty well if I do say so myself.  I plan on making some for Christmas gifts, and keeping one (or more) for myself.

Will you dare to give handmade on Monday morning for Dare to DIY: give handmade?  Need some extra inspiration?  See how KimMichelle, and Rachel gave handmade.

What do you think about the whole state shaped necklace craze?
Think you’ll attempt this DIY project?

I’m sharing this at the following parties: Home Stories A to ZTatertots and JelloHouse of HepworthsThe Shabby Creek CottageTidy MomLiz Marie BlogCraftomaniacThe Shabby NestPositively SplendidWhipperberryFunky Junk InteriorsClassy ClutterToday’s Creative BlogUncommon DesignsLive Laugh RoweMiss Mustard Seed, and Serenity Now.

Dare to DIY: entertain

Who’s ready to show off their entertainment themed project?

I’m thrilled to be co-hosting with Decor and the DogMaybe Matilda and  Newly Woodwards.

This week it’s Dare to… entertain!
DIY something for your table. This could be something from last wee’s Thanksgiving table or a new Christmas look. Get creative and use things in new ways. Or go true DIY and make something totally new. Ideas include place mats, table runners, place cards or centerpieces.

I posted my simple (and sparkly) table setting on Saturday.

Kim created a pretty yellow and turquoise table setting.

Michelle showed off her fancy table setting.

Rachel sewed a (completely unique and never done before) ‘Grateful For’ Thanksgiving table runner.

Each Monday, the link party goes live for that week’s Dare to DIY challenge. You can link up as many projects as you wish, as long as the posts correspond with the theme of the week.

You can link up on any of our four blogs listed above. The linky below will stay live through Wednesday. This Wednesday, each of us will spotlight at least 3 projects we loved from the week on our blogs. We’ll also pin those projects on our shared Pinterest board.

The only rules:
1. Please follow the Dare to DIY theme of the week (this week is ‘dare to be thankful’).
2. Please link back to Dare to DIY by linking to at least one of our blogs (or copy this: I’m sharing this at the Dare to DIY party hosted by Decor and the DogMaybe MatildaNewly Woodwards, and Two Twenty One!)
3. Please go to at least one other blog and comment. This is a party. So get to know a few other bloggers.


Simple Holiday Table Setting

It’s already time for the second round in the Dare to DIY challenge.  This week’s theme?   Entertain.

I created this sparkly bird themed centerpiece for our kitchen island.  AND I used everything I already owned so, like my Thanksgiving bunting, this project cost a whole $0.  That meant more money in my pocket for Black Friday sales.

 I grabbed a silver sequin placement I’ve had for a few years and plopped my Ikea lantern on top.  But I didn’t wuss out and throw in a candle.  No, no.  I grabbed some moss, a fake bird nest, a glass bird ornament (complete with tail feathers) and put them inside the lantern.  Then I placed a tealight candle on each corner of the placemat   Boom.  When in doubt, put a bird on it.  Or in it.

Deciding to go the extra mile, I put out two table settings (with things I already owned).  An over achiever I am.

I used a silver beaded placemat from Kohls, silver charger from Micheal’s, my late aunt’s Silver Moon china, white napkin, and a glittery pine cone ornament (last year at Kohls) for each place setting.

Here are a couple romantical nighttime photos of the centerpiece.

There you have it.  Will you dare to entertain on Monday morning?  I just proved that it’s pretty simple, so you really don’t have an excuse.

Need some extra inspiration?  See how Kim, Michelle, and Rachel entertained.

Are you planning to participate in Monday’s challenge?
Do you believe in the ‘put a bird on it’ motto?

Dare to DIY: Be Thankful Features

There were so many great ‘be thankful’ projects linked up on Monday!  You guys did an awesome job!

Today all of us (Kim, Michelle, Rachel, and I) are spotlighting three projects we loved.  We made sure that none of us spotlighted the same projects, so make sure you head over to the other chicks’ blogs and see if you were featured.

If pinning, please pin from the original source!

Erika from Our Cozy Cubbyhole created this beautiful handmade card.

 Kelly from View Along the Way whipped up this easy Thanksgiving banner.

Ashley from Naptime DIY painted this pretty ‘grateful’ sign.  And check out her wine cork cork board!

Make sure you check back on Friday, when the four of us are sharing our Dare to DIY: entertain projects!

Have a safe and happy Thanksgiving!

Dare to DIY: be thankful

Alright, let’s get this party started!

I’m thrilled to be co-hosting with Decor and the DogMaybe Matilda and  Newly Woodwards.

This week, it’s Dare to… be thankful!
DIY a thanksgiving project to remind you to be grateful during this season. Ideas include a Thanksgiving advent calendar, artwork and banners.

I posted my ‘give thanks’ bunting on Friday.

Kim shared her gobble sign.


Michelle showed off (and shared) her ‘Thanks is For Giving” sign and prints.

And Rachel made an adorable turkey hand print shirt for her equally adorable toddler.

Each Monday, the link party goes live for that week’s Dare to DIY challenge. You can link up as many projects as you wish, as long as the posts correspond with the theme of the week.

You can link up on any of our four blogs listed above. The linky below will stay live through Wednesday. This Wednesday, each of us will spotlight at least 3 projects we loved from the week on our blogs. We’ll also pin those projects on our shared Pinterest board.

The only rules:
1. Please follow the Dare to DIY theme of the week (this week is ‘dare to be thankful’).
2. Please link back to Dare to DIY by linking to at least one of our blogs (or copy this: I’m sharing this at the Dare to DIY party hosted by Decor and the Dog, Maybe Matilda, Newly Woodwards, and Two Twenty One!)
3. Please go to at least one other blog and comment. This is a party. So get to know a few other bloggers.

Okay, it’s time for the party. Can’t wait to see your projects!


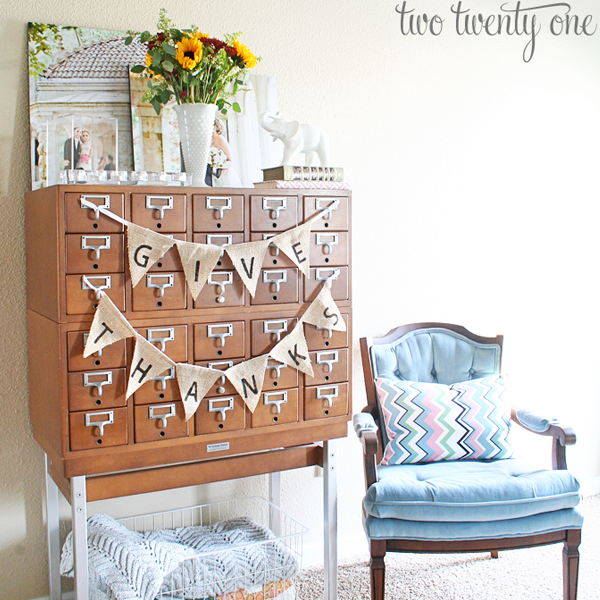
Thanksgiving Burlap Bunting

I never decorate for Thanksgiving.  I typically use the time between Halloween and Christmas to mentally prepare myself for the madness that is decorating for Christmas.  But I whipped up a small Thanksgiving project for the ‘be thankful’ portion of the Dare to DIY series I’m co-hosting with Kim, Michelle, and Rachel.  And I knew the perfect place for my creation– on the card catalog, of course.

Honestly, I wanted the bunting to say ‘give turkey’ but I figured ‘give thanks’ was a more practical approach.

This project was pretty easy to execute and took about an hour to make.  I used leftover burlap from my ruffled burlap table runner project and a bunting template, which I edited because I have perfection issues, for the the bunting flags.  The letters were stenciled on with acrylic paint .  The stencils were created with my Silhouette (speaking of Silhouettes, have you entered the Silhouette giveaway?).  And I hot glued the flags to grosgrain ribbon.  I had all the materials on hand so I spent a whopping $0 to create this festive burlap bunting.

I think it looks pretty good tied onto the card catalog.  But then again I think you could tie underwear to the card catalog and it would still look good.   It’s like Channing Tatum.  That man would look smokin’ in a potato sack.  Or underwear.  Or burlap bunting.

Jack even agrees that the bunting looks great on the card catalog.  And he’s picky about his endorsements.

So will you Dare to DIY on Monday?  Read all the details here.

Are you participating in the Dare to DIY series?
What are you planning to make?
5,000 bonus points awarded to the person who integrates Channing Tatum into their creation.

I’m also sharing this at the following parties: Home Stories A to ZTatertots and JelloHouse of HepworthsThe Shabby Creek CottageTidy MomLiz Marie BlogCraftomaniacThe Shabby NestPositively SplendidWhipperberryFunky Junk InteriorsClassy ClutterToday’s Creative BlogUncommon DesignsLive Laugh RoweMiss Mustard Seed, and Serenity Now.

Related Posts Plugin for WordPress, Blogger...